How to Build a React Typescript NPM Package
I wanted to share the Hungrimind User Interface, so others can use it. The easiest way to do this is via NPM Package. NPM stands for Node Package Manager, and it allows you to bring in other people’s code into your project by running a single command: npm install <package-name>.
Before trying to publish this package, I had never published a package to the npm registry before. I spent the past few weeks learning everything about npm and the publishing process. It was quite a pain, but I’m writing this to make it easier for you.
By the way, we will be building a React component package using Typescript and Tailwind. Which is the right way to write React code. (If there is a right way.)
What You Will Need
- A git repository
- An account on https://www.npmjs.com
- Node and npm installed on your machine
package.json
The most important file when creating a package is the package.json file. This is the configuration file that defines what your package is, what resources it needs, where files are located, and any commands.
package.json is the daddy of every npm package.
To create this file run the npm init command in your folder. This will walk you through a few questions to have a starting point in your configuration file.
This is what the file looks like for us after that command. We will walk through every part of the package.json throughout the rest of this article.
{ "name": "@hungrimind/pkg-demo", "version": "1.0.0", "description": "Demo for hungrimind.com article", "main": "index.js", "scripts": {}, "repository": { "type": "git", "url": "<https://github.com/hungrimind/demos.git>" }, "keywords": ["demo"], "author": "Hungrimind", "license": "ISC"}Descriptive Fields
The easiest part is the descriptive fields. It is information that describes your package, and most of it will show up on the npm listing page. Only name and version are technically required, but there are many others you should fill out:
name- The name of the package. If your package name is taken you can prefix it with@company/like I did.version- Your package version.description- The description (what are we doing here).keywords- Keywords about your package that help with search and discoverability.license- Terms under which this free software can be used. The most common ones are “MIT” or “ISC”.author- Who published the package in the following formatYour Name [email@example.com](email@example.com>). Name, email, and website are all optional.repository- Repository where your package is hosted. This will show up on the package page at https://www.npmjs.combugs- Where developers should report bugs when they see them.homepage- Extra information where people can learn about this package.
Dependencies
The other key part within the package.json file is adding in all your dependencies. Dependencies are other packages and tooling that we will use within our package. We will need to add the following dependencies:
typescript- So we don’t have to use shitty Javascript.tsup- This is for bundling. We will cover this in a section below.react/react-dom- To get access to all the React UI components.@types/react/@types/react-dom- Types for React.tailwindcss- CSS classes to make your apps look nice.autoprefixer- Adds prefixes to CSS classes. This is for better browser support.postcss- Facilitates the bundling process for CSS.
To install these you need to run the command npm install -D <enter-dependency-here>. After you run it for each of the dependencies you should see it populated in the package.json.
Most of your packages should be installed as
devDependenciessince the end bundle will have everything bundled inside a single file. You might want to utilizepeerDependenciessometimes. This is covered in depth later.
Scripts
The scripts field is an array of customizable commands that can be run on your project using npm run.
To show a simple example we can create a linting script that goes through all our files and makes sure we are following the typescript linting rules.
"scripts": { "lint": "tsc" },Now when we run npm run lint in our terminal you will see a list of commands. This is because there is no typescript configuration or any code, but when we add our typescript to the project, this command will build our project using typescript and show any errors.
The most important script however is our build script. The build script will run "tsup". tsup is the bundler that we will use, and there’s a whole section about it coming up.
"scripts": { "build": "tsup", "lint": "tsc" },Setting up Typescript
To set up the typescript config file run the command below:
./node_modules/.bin/tsc --initThis will create a tsconfig.json file where you can define your typescript rules. We can keep the default ones for now, but there is one rule that we will need since we are developing in React: "jsx": "react-jsx". Since react code is written in jsx we need to make sure our compiler is aware of that.
Now create an index.ts file in the root directory and if you run the npm run lint command it will finally work. This will emit a compiled index.js file. Feel free to keep that if you want, but we don’t need this file. I like to keep the code base clean by adding "noEmit": true to your tsconfig.json, it will not create that file anymore.
If you run it again, no file will be created, and if there are no linting issues you won’t see any errors. Type in some random characters in the index.ts and run the command again to see the errors.
What is a Bundler?
The critical part of this whole process comes down to the bundler. Then bundler takes the React code that you wrote and turns it into the files that will get uploaded to npm for distribution.
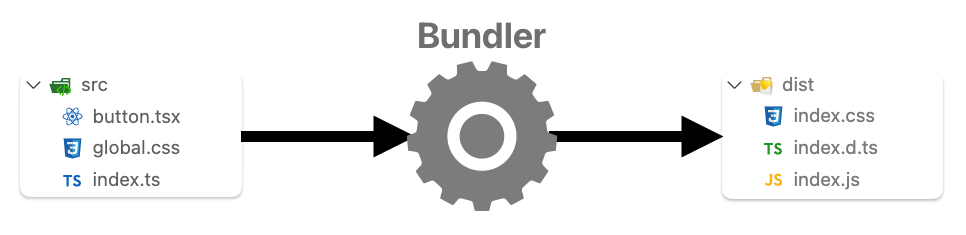
In our case, it’s going to take all the different files and components and everything within our React code and create a single index.js file.
If you are writing Javascript code, index.js is all you need. However, we are using Typescript which means we need another file where our types will be defined. This will be the index.d.ts file.
To generate these files we need to use our bundler. There are many options out there like webpack, rollup, or esbuild. We will use the tsup bundler because it is built specifically for typescript and react and is easy to use.
tsup
We already set up a script earlier in this article to run the bundling command (npm run build). If you try to run that command you will get an error saying:
No input files, try “tsup <your-file>” instead
tsup can generate your files with no configuration necessary so if you choose to do that you can update the command in the package.json to use tsup index.ts.
Another option is creating a configuration file for tsup. You can do all the same actions through the command line, but it looks nicer in a separate file. Create a file named tsup.config.ts. And you can copy the following into it:
import { defineConfig } from "tsup";
export default defineConfig({ entry: ["index.ts"], dts: true, clean: true,});We defined our entry point as index.ts and added two fields:
dts- This is for generating declaration files (the file containing your types). It will generate anindex.d.tsfile that will hold all your types.clean- This removes all the old output files before generating the new ones.
Now when you run npm run build you will see an index.js file and an index.d.ts file in a newly created dist directory. dist stands for distribution. These are the files that other people will be using when they install your package. Going back to our package.json we need to set these files in the main and types field.
"main": "./dist/index.js","types": "./dist/index.d.ts",Create a Component
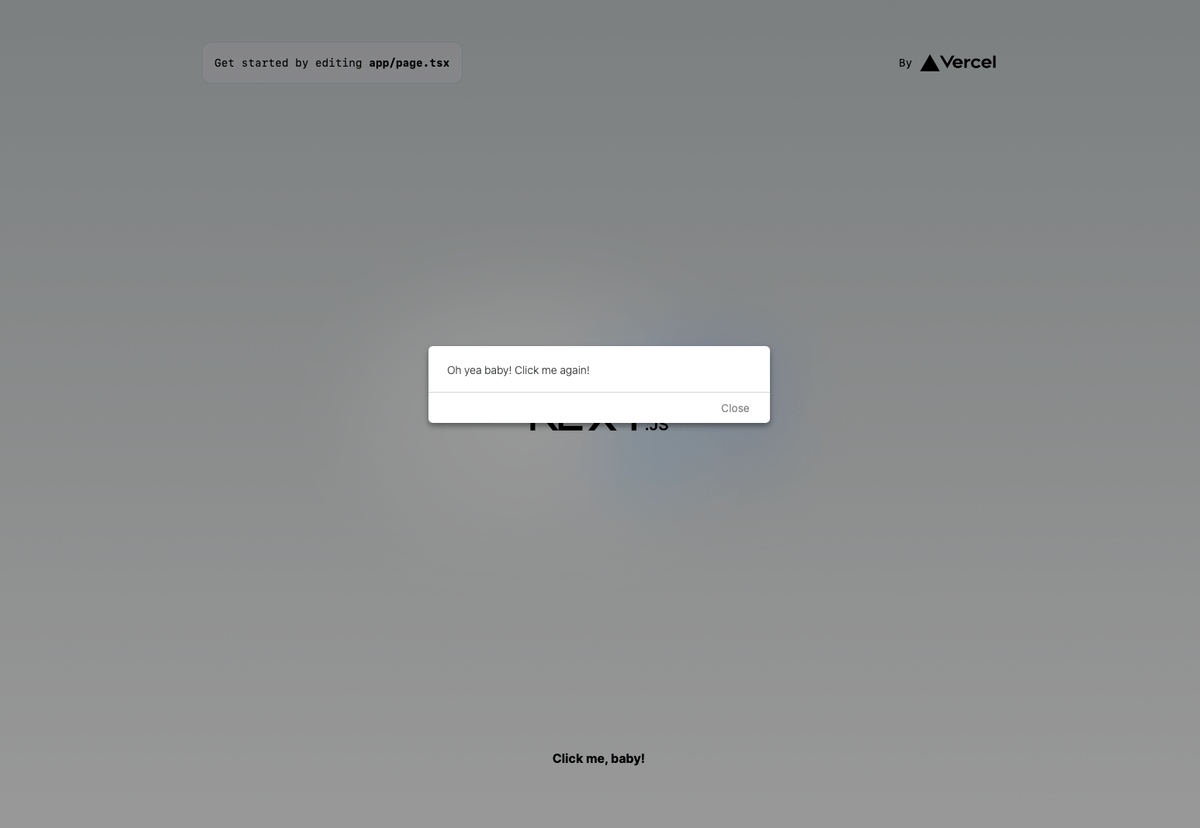
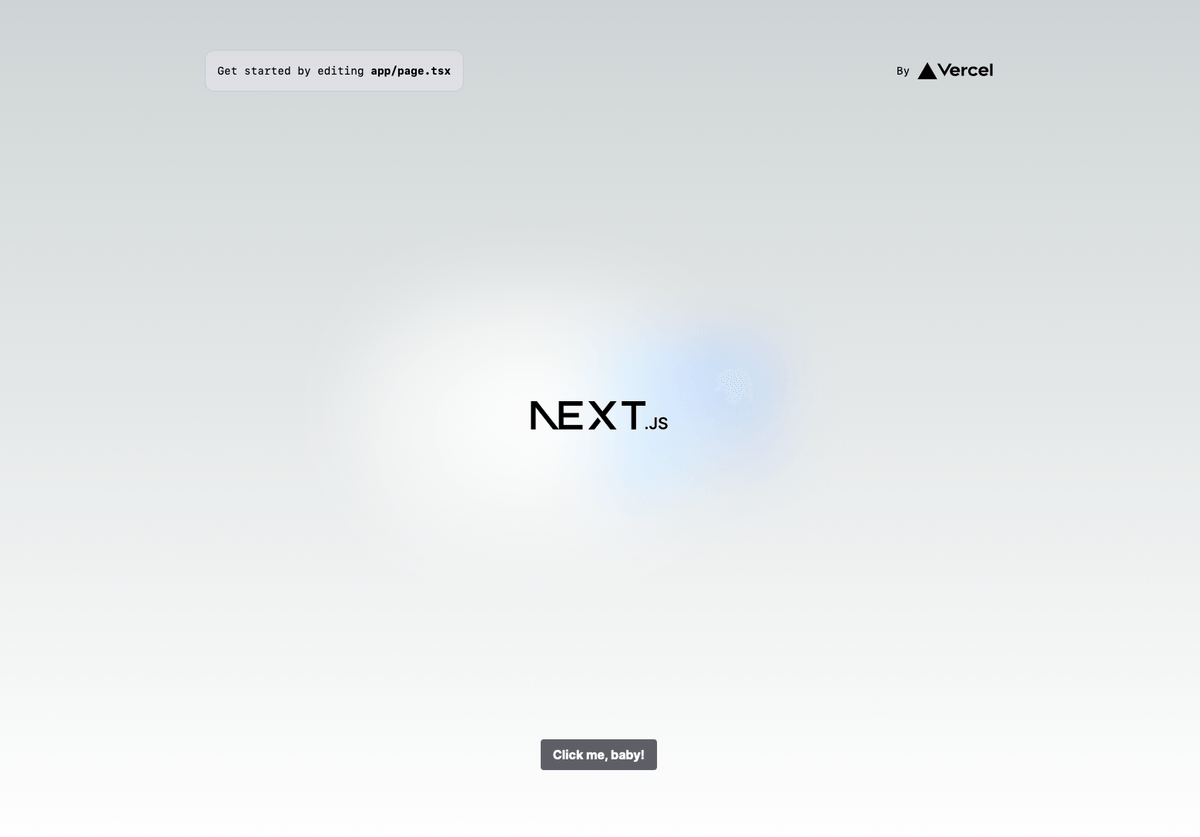
Let’s add some react code to this project so we can see this whole flow in action. I built an R-rated button that is not recommended for kids. This code will be held in a button.tsx file in the root directory.
import React, { useState } from "react";
export const Button: React.FC = () => { const [count, setCount] = useState(0); return ( <button onClick={() => { switch (count) { case 0: alert("Oh yea baby! Click me again!"); setCount(count + 1); break; case 1: alert("You click me soooo good!"); setCount(count + 1); break; case 2: alert("Woah you're getting a little too spicy with me!"); setCount(count + 1); break; default: alert(`We're done. You clicked me too hard.`); break; } }} > {count < 3 ? "Click me, baby!" : "😒😒😒"} </button> );};Inside the tsup.config.ts we configured the entry point of our application to be the index.ts. To have this component be part of the bundle we need to export it within the index.ts as well.
export { Button } from "./button";npm link
Before we publish this package, we want to test it to make sure everything is working properly. This is where the npm link command comes in. In the root directory of the package run npm link and it will create a locally stored version of this package. Then create a test project somewhere (I created a folder called test with a NextJS project), and inside that project run npm link <your-package-name>.
Now you can use this component within your test project.
npm link Caveat
Whenever you use npm link it will copy all the contents of the package into the node_modules of your test project. This is not a problem most of the time, but it is something to be aware of when debugging.
For example, I ran into an issue of duplicate dependencies of react. Since react is part of the devDependencies it is not included in the final bundle, but when using npm link it is included. To fix this I moved the react dependency to peerDependencies.
Add Styles
Tailwind
Tailwind will also have its config file, just like everything else. To initialize it run:
./node_modules/.bin/tailwindcss initWithin the tailwind.config.js the only thing we need to update is the content field to let tailwind know which files will be using the classes.
Since the only file using it will be the button.tsx that is in the root directory we can update that field to:
content: ["./*.tsx"],The next step is to create a global.css file in the root directory with the following code:
@tailwind base;@tailwind components;@tailwind utilities;Now remember our index.ts is the entry point of the package. So we need to make sure these styles are being used there. So our index.ts should look like this:
import "./global.css";export { Button } from "./button";PostCSS
postcss is the tooling that puts all of this together. And once again, it needs its own separate config file. Create a postcss.config.js and add the following:
module.exports = { plugins: [require("tailwindcss")(), require("autoprefixer")()],};Test it
We are all ready to go. To test it out add some tailwind styling to our naughty button component:
className = "bg-zinc-500 hover:bg-zinc-700 text-white font-bold py-2 px-4 rounded";Run npm run build to build with the new CSS configuration. You should see a new css file populated in the dist folder.
When you want to use these styles in your test project (or the real project after it is published), you need to import those styles into your application. There are now two imports in my test project:
import { Button } from "@hungrimind/pkg-demo";import "@hungrimind/pkg-demo/dist/index.css";There it is. We have a working package built with React, Typescript, and Tailwind.
Publish Your Package
The last step is making this package publicly available on the npm registry. You can have private packages as well, but only if you have a paid npm account.
Publishing is one of the simplest steps in this whole process. Make sure you have an account on npm. Then run the npm login command in the terminal. This will lead you to log in on the npm site.
You should see a successful login message. And then all you need to do is run the npm publish command.
If you used the company name as a prefix for the package (ex. @hungrimind/pkg-demo) you will get a message that you must pay. You can choose to pay to publish it privately or run
npm publish --access publicto publish the same package publicly.
Congratulations! You are now a maintainer of a published package!
Tips
src Folder
For simplicity, we only had one file in this demo project. As you create your React package you will probably have multiple files and multiple components. It’s a good idea to organize those into a src folder. You can see an example of this in the hungrimind course-kit package.
Once you do this, you need to update the tsup.config.ts to point to src/index.ts instead and your tailwind.config.js content field to content: ["./src/**/*.tsx"].
.gitignore
If you are going to be hosting this code on GitHub (as you should since this is a public package), you should not be pushing the node_modules and the dist folder. These are not files that need to be manually changed, and only need to be used when deploying or actively developing. Use this as a starting place for your .gitignore file:
/node_modules/dist
.env.DS_Store.npmignore
Even more importantly you don’t want to be publishing every single file to the npm registry. The main folder that needs to be published is the dist folder. In this walkthrough, I created a test folder that is hosted on GitHub, but I do not want that to be published. (I accidentally did publish it initially whoops).
If you read the first tip and are using the src folder, this is a good starting point:
/src/node_modules/test
.env.DS_Store
tsconfig.jsontsup.config.tscourse-kit Package
This whole journey of learning about the npm registry came about because we wanted to share the UI that we are crafting publicly. Our goal is to make education more fun for as many people as possible.
On top of that, we want this to be a more open development, where we can work together, with the community, to make the best UI for learning ever created. Together we can achieve the goal of teaching the next generation!
If you would like to contribute to this package, the repository is located here. And if you have any questions or want to just chat, join us on Discord.
Even though I have a solid grounding in the basics of developing packages now, I’m sure many of you have years of experience in this, and I would love to learn from you.
Thank you for reading and keep feeding your hungry mind 🖤
Get Articles in Your Inbox
Sign up to get practical tutorials and production patterns delivered to your inbox.