The Definitive Guide to Navigator 2.0 in Flutter
Flutter has two ways to do navigation. The original navigation (Navigator 1.0) wasn’t very complete, so Flutter introduced a new way to do navigation: Navigator 2.0. And the reception was probably not what they expected.
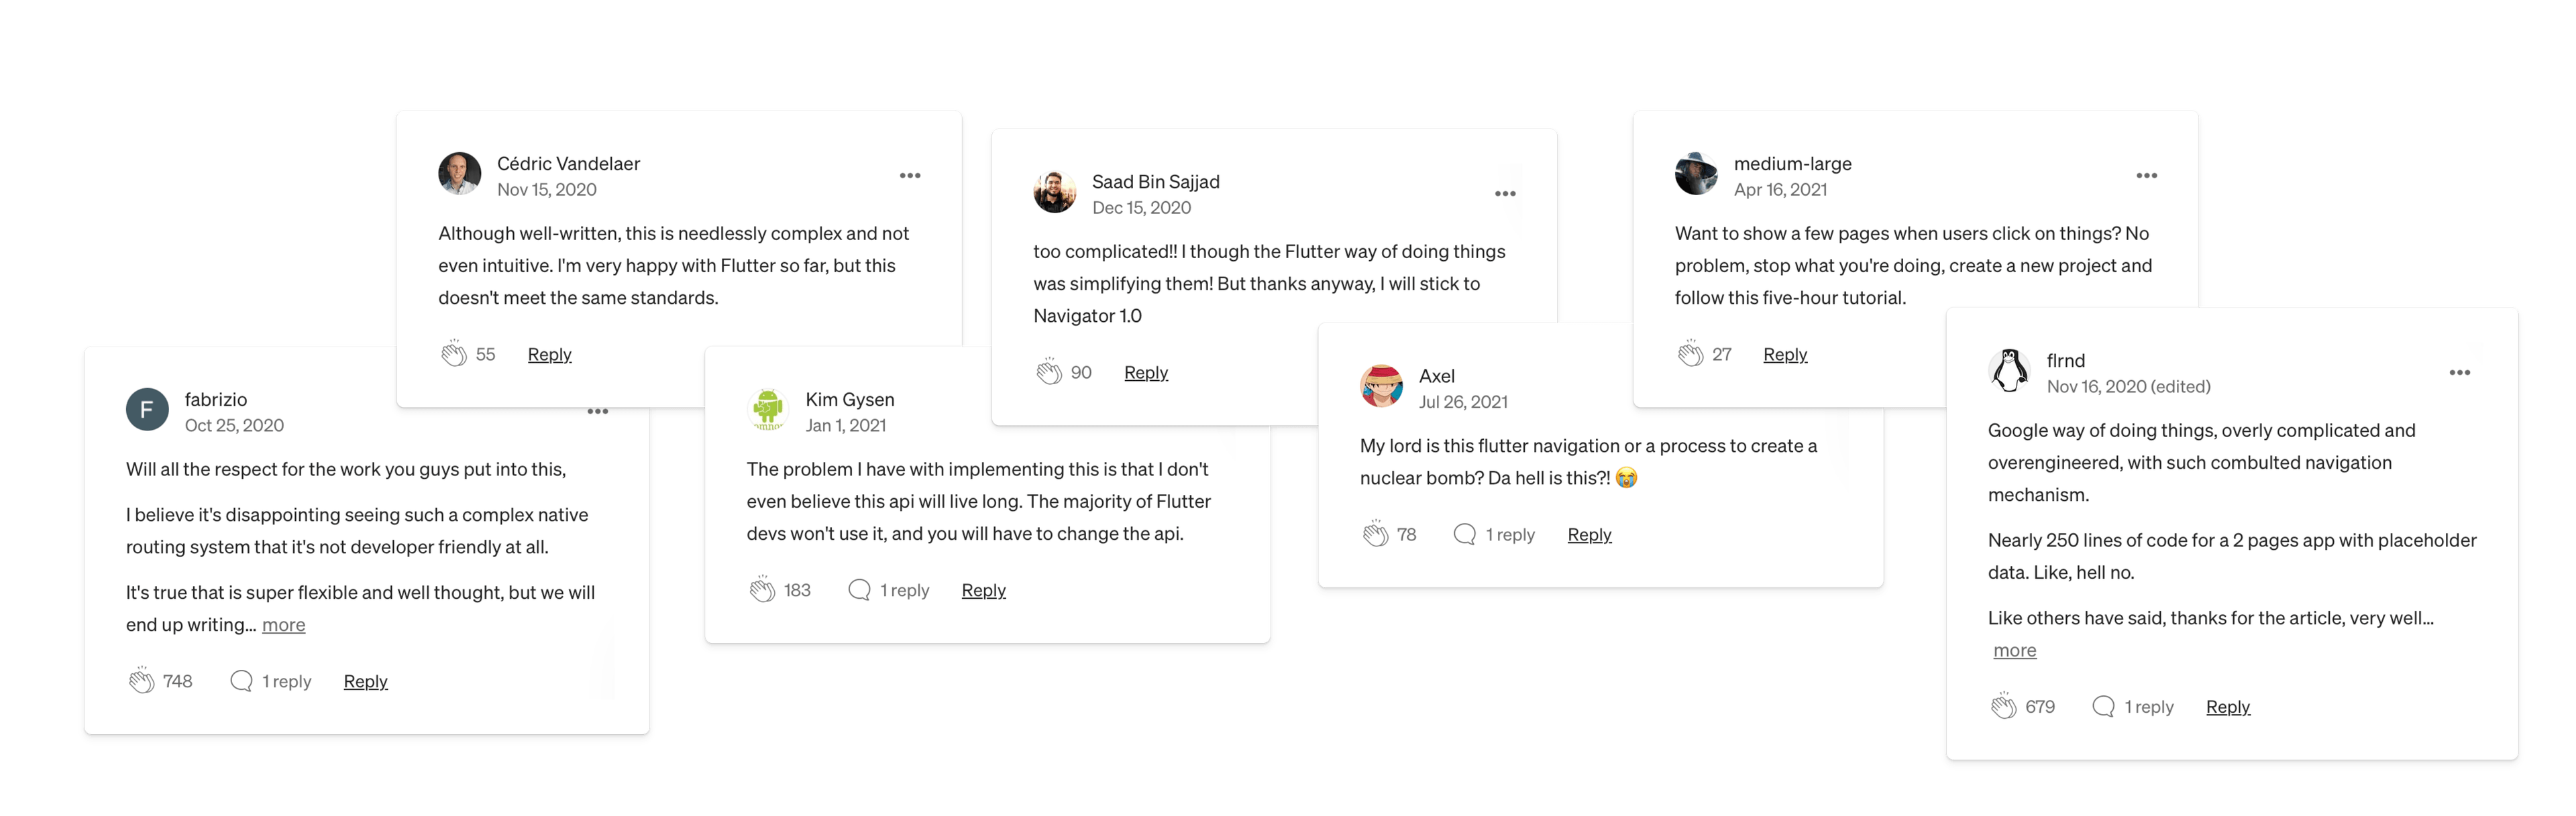
Because of this, there is very little information online about how it works. Even Flutter’s documentation barely mentions Navigator 2.0. There are 9 documents about navigation, and Navigator 2.0 is mentioned only once, without any explanation of how it works. It seems like Flutter is trying to hide that they ever made this.
In this guide, we will cover everything you need to know about Navigator 2.0.
- Why was it so disliked?
- How does it work?
- Why I believe you should still use it.
Why Navigator 2.0
When Flutter was originally released in 2018 it had one navigation system. We will refer to this as Navigator 1.0. The core problem Flutter was built to solve, is the ability to build natively compiled apps using one code base for any operating system. While the vision was to be able to support web and desktop applications, in the early days it only supported Android and iOS.
Navigator 1.0 is good enough for these two platforms since mobile applications don’t require very complicated navigation and Navigator 1.0 is simple and easy to use.
The core concept to understand in navigation is the navigation stack. As a user, you only see the very top layer of the stack. To see a new page, you can push views onto the stack, and to see the previous page, you can pop views off of the stack.
That is the key concept of Navigator 1.0. It still had its flaws like deep linking, nested navigation, and not being declarative like the rest of Flutter, but people were able to look past those flaws and find workarounds.
Life was sunshine and rainbows during those times, but then Flutter Web became a focus for the team. Flutter Web brought in even bigger and more noticeable navigation problems like the URLs not being synced to the navigation stack and the browser back and forward buttons not working. For Flutter to become a true cross-platform framework, navigation would need a complete rework.
The biggest shift that needed to happen, was that navigation needed to be declarative, instead of imperative.
Imperative vs Declarative
The Flutter framework is built to be a declarative framework. That means that the way you write Flutter code is that you describe what the user should see based on a state. Then, the Flutter framework takes care of building the UI based on the declaration.
For example, when we want to show a text on the screen, we declare what we want to see, and Flutter just builds it.
Text(isLoggedIn ? 'Welcome back!' : 'Please log in');Where as imperative you have to tell the system to do things step-by-step. For example, if Flutter was an imperative framework, the way to display a text would look like the code below. Instead of writing what you want to see, you are telling the system what it should do.
if (isLoggedIn) { textView.setText("Welcome back!");} else { textView.setText("Please log in");}The above code is not code that you can write in Flutter. However, some parts of Flutter don’t follow the declarative approach including Navigator 1.0.
The widget that handles navigation in Flutter is called Navigator. This can be defined manually, but it is also defined within a MaterialApp. The way navigation works in Navigator 1.0, is you find the Navigator within your app using Navigator.of(context), and then call a function like push or pop to add a route into the navigation stack. This is very similar to our silly textView.setText example.
This approach does not match how the rest of Flutter works, so in Flutter version 1.22 a declarative Navigator 2.0 was introduced.
Navigator 2.0
Navigator 2.0 makes navigation declarative. You no longer have functions to push and pop into the navigation stack, but instead, you control the navigation stack and define what the stack should look like at any point.
Great! Problem solved, right?
Technically, yes. But then why was it so poorly received?
Mostly due to its complexity. There are two reasons why it was so complex:
- The Flutter team plans to support both Navigator 1.0 and Navigator 2.0 so there are edge cases and caveats needed to make both of them work. And the guides they posted had to explain all those caveats.
- There are not many guides.
So that’s what we’re setting out to do here: create an in-depth guide to explain Navigator 2.0.
Navigator 2.0 introduces two main widgets: Page and Router. With Navigator 1.0 we had to push a MaterialPageRoute onto the stack, now in Navigator 2.0 we define the stack ourselves. This stack consists of a list of Page widgets. Then, the Router widget manipulates the stack. That’s the beauty of Navigator 2.0, there’s no hidden functionality behind navigation. It’s just a stack of Page widgets that you manipulate.
In concept, it’s straightforward, but as you work with it, you realize how complicated navigation in general is. Especially when you need to support apps and websites.
What is happening in 1.0
Before we keep going I want to fully cover what Navigator 1.0 is and how it works.
We will only talk about MaterialApp as an example, but there are CupertinoApp equivalents for everything. (Ex. MaterialPage and CupertinoPage).
The MaterialApp widget that you create at the root of your application is doing a lot of things under the hood that make your apps work nicely. One of those is it’s creating a navigator for you. You can get access to this navigator in your application using Navigator.of(context).
This navigator internally creates a list of routes. You can add to this list of routes using the push method and you can remove routes using the pop method. If you look at the widget that we push, it is a route called MaterialPageRoute.
Navigator.of(context).push(MaterialPageRoute(builder: (context) => const BooksScreen());Pages API
A Page is basically that underlying route that is being maintained by the Navigator. So instead of only being able to push and pop routes, you set the routes.
Below is an example showcasing this. You can set the pages directly within the Navigator and these will be the routes that your app has. The code below will start your application with a navigation stack of 3 widgets. Then you can use the same navigator to pop the pages or to push new pages onto it.
MaterialApp( home: const Navigator( pages: [ MaterialPage(child: HomeScreen()), MaterialPage(child: BooksScreen()), MaterialPage(child: SettingsScreen()), ], ),);If you are building a simple mobile app, this might be all that you need. You can manage the pages using state management, and you would have a declarative way to manage your navigation with full control over the navigation stack.
The main things you would miss are more apparent when working with the web: deep linking and syncing browser URLs.
Router API
This is the part where it gets a little complicated, but it’s not Flutter’s fault. It’s mostly due to all the little nuances that come with browsers.
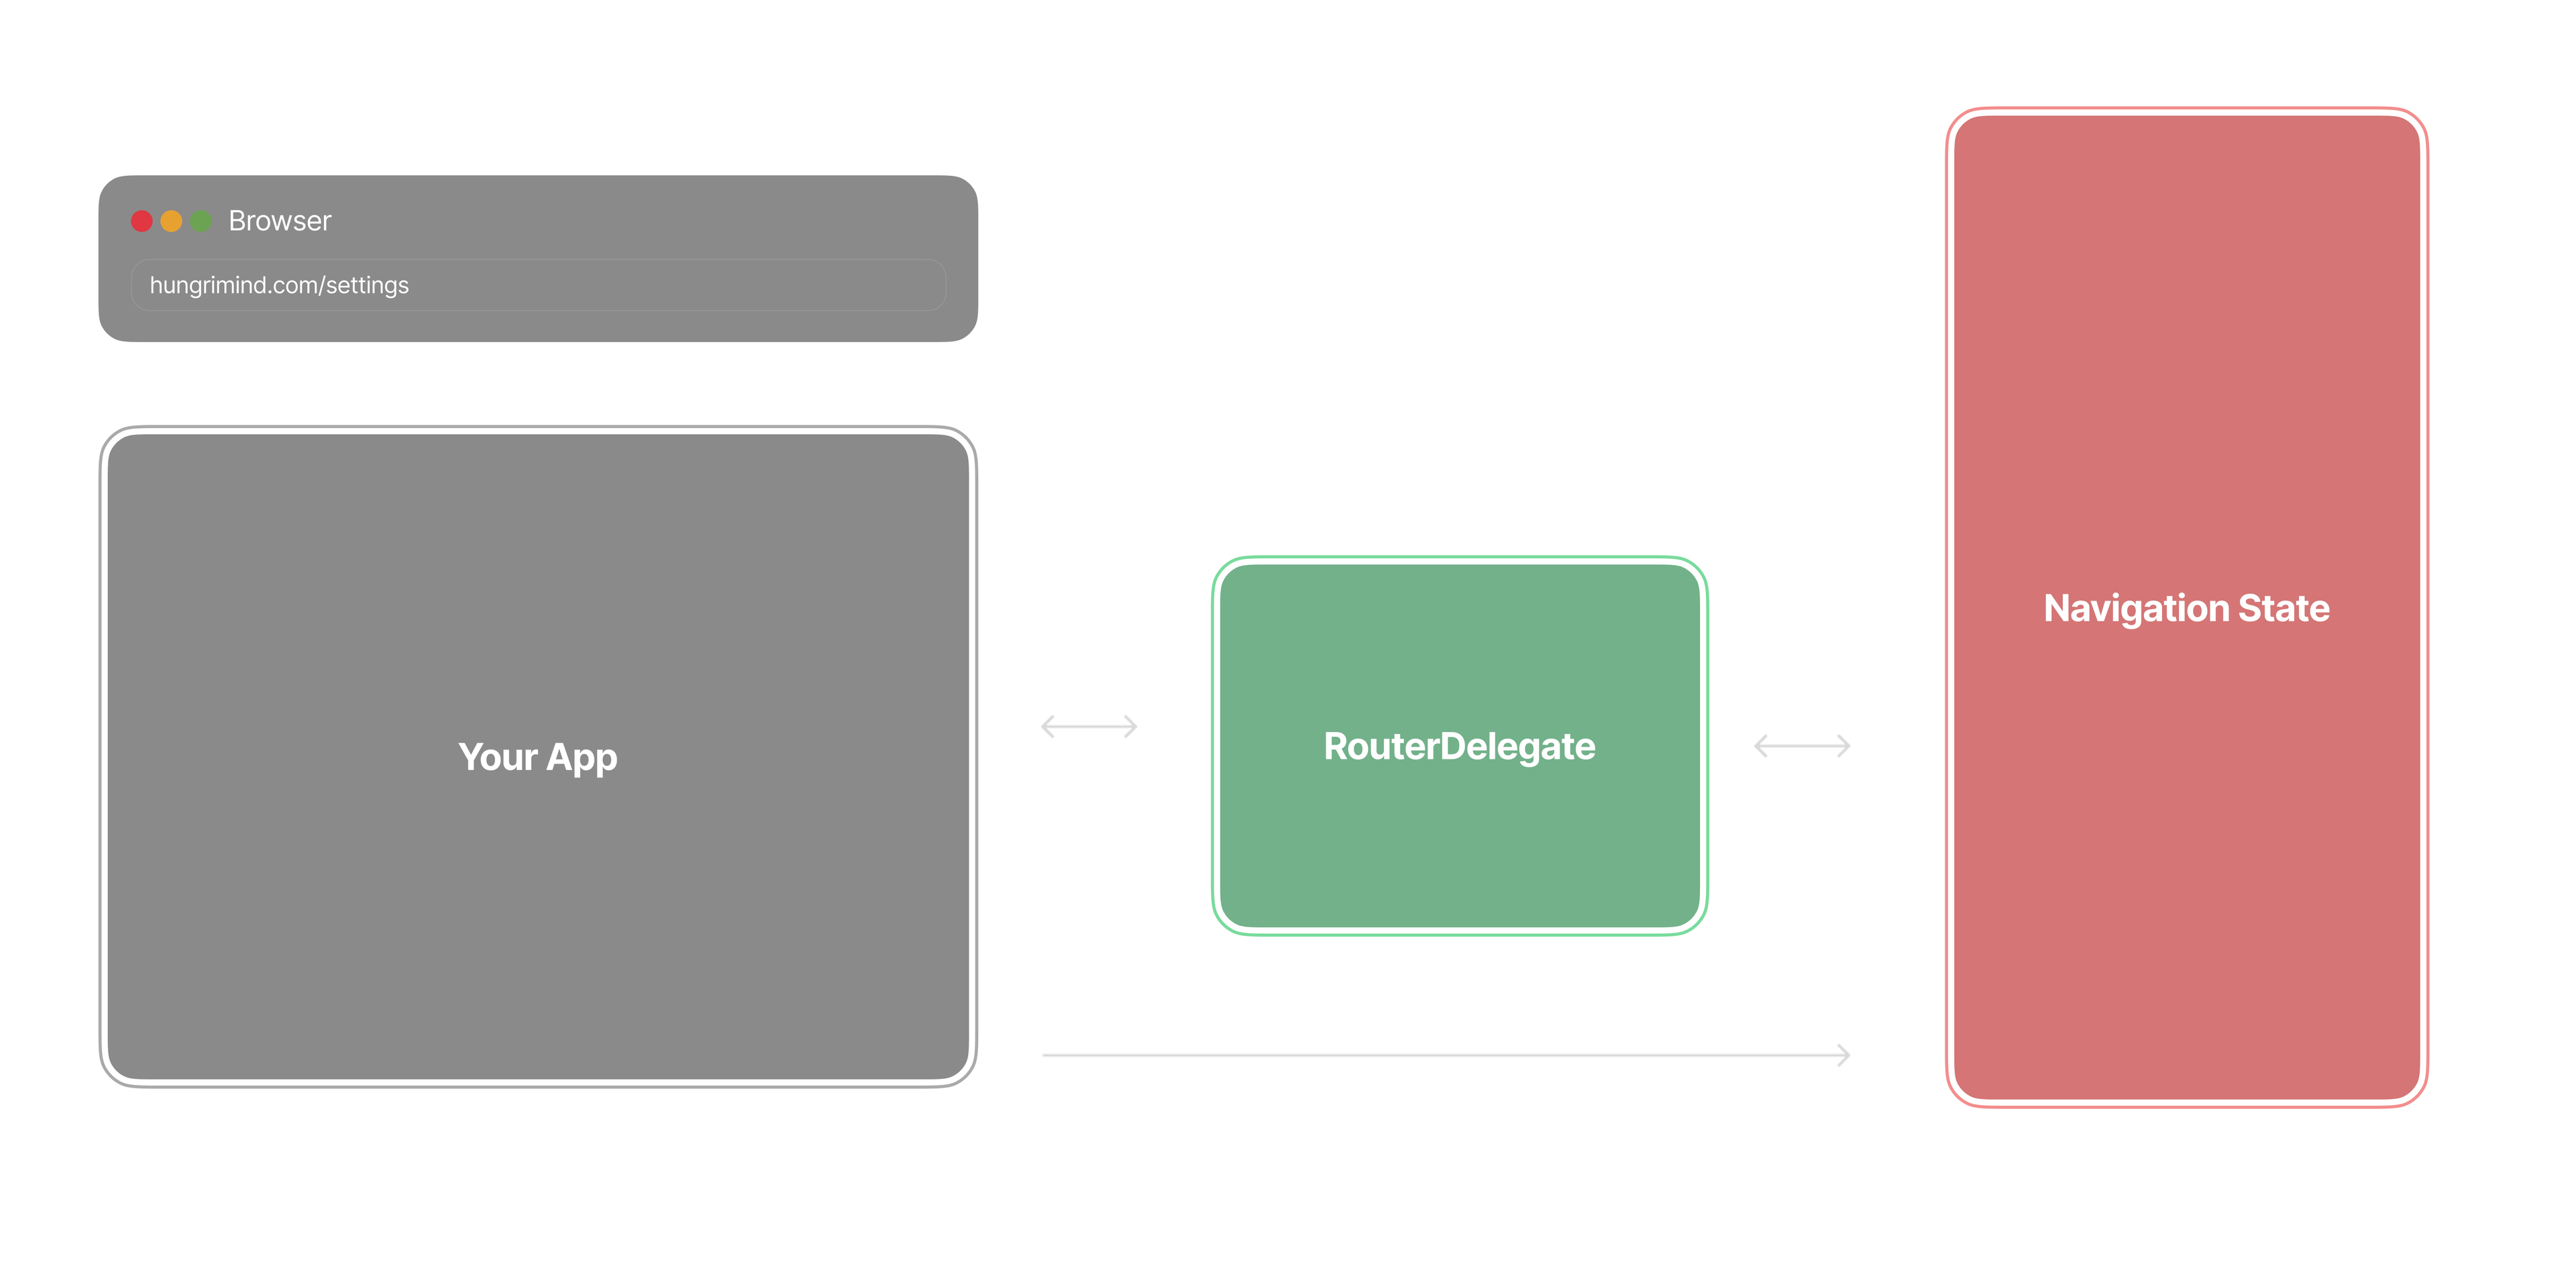
With Navigator 1.0 we had a Navigator widget that would handle the navigation within your app. We still have that same Navigator widget, however it is defined within the Router widget. You can declare the Router yourself, like this.
MaterialApp( home: Router( routerDelegate: _routerDelegate, routeInformationParser: _routeInformationParser, ),);Or in a similar way that MaterialApp contains a Navigator, a MaterialApp.router contains a Router.
MaterialApp.router( routerDelegate: _routerDelegate, routeInformationParser: _routeInformationParser,);There are two parts that a router needs to have full web functionality: RouterDelegate and RouteInformationParser
RouterDelegate
In the Pages API example, we showed how you can set the pages directly in a Navigator. When you use a Router, you do the same thing just within the build method of the RouterDelegate.
Navigator( pages: [ MaterialPage(child: HomeScreen()), MaterialPage(child: BooksScreen()), MaterialPage(child: SettingsScreen()), ],),Now the complexity comes in when you have to manage these pages. When you use a browser, the routing information is the URL. How do you transform the URL into a Page and vice versa?
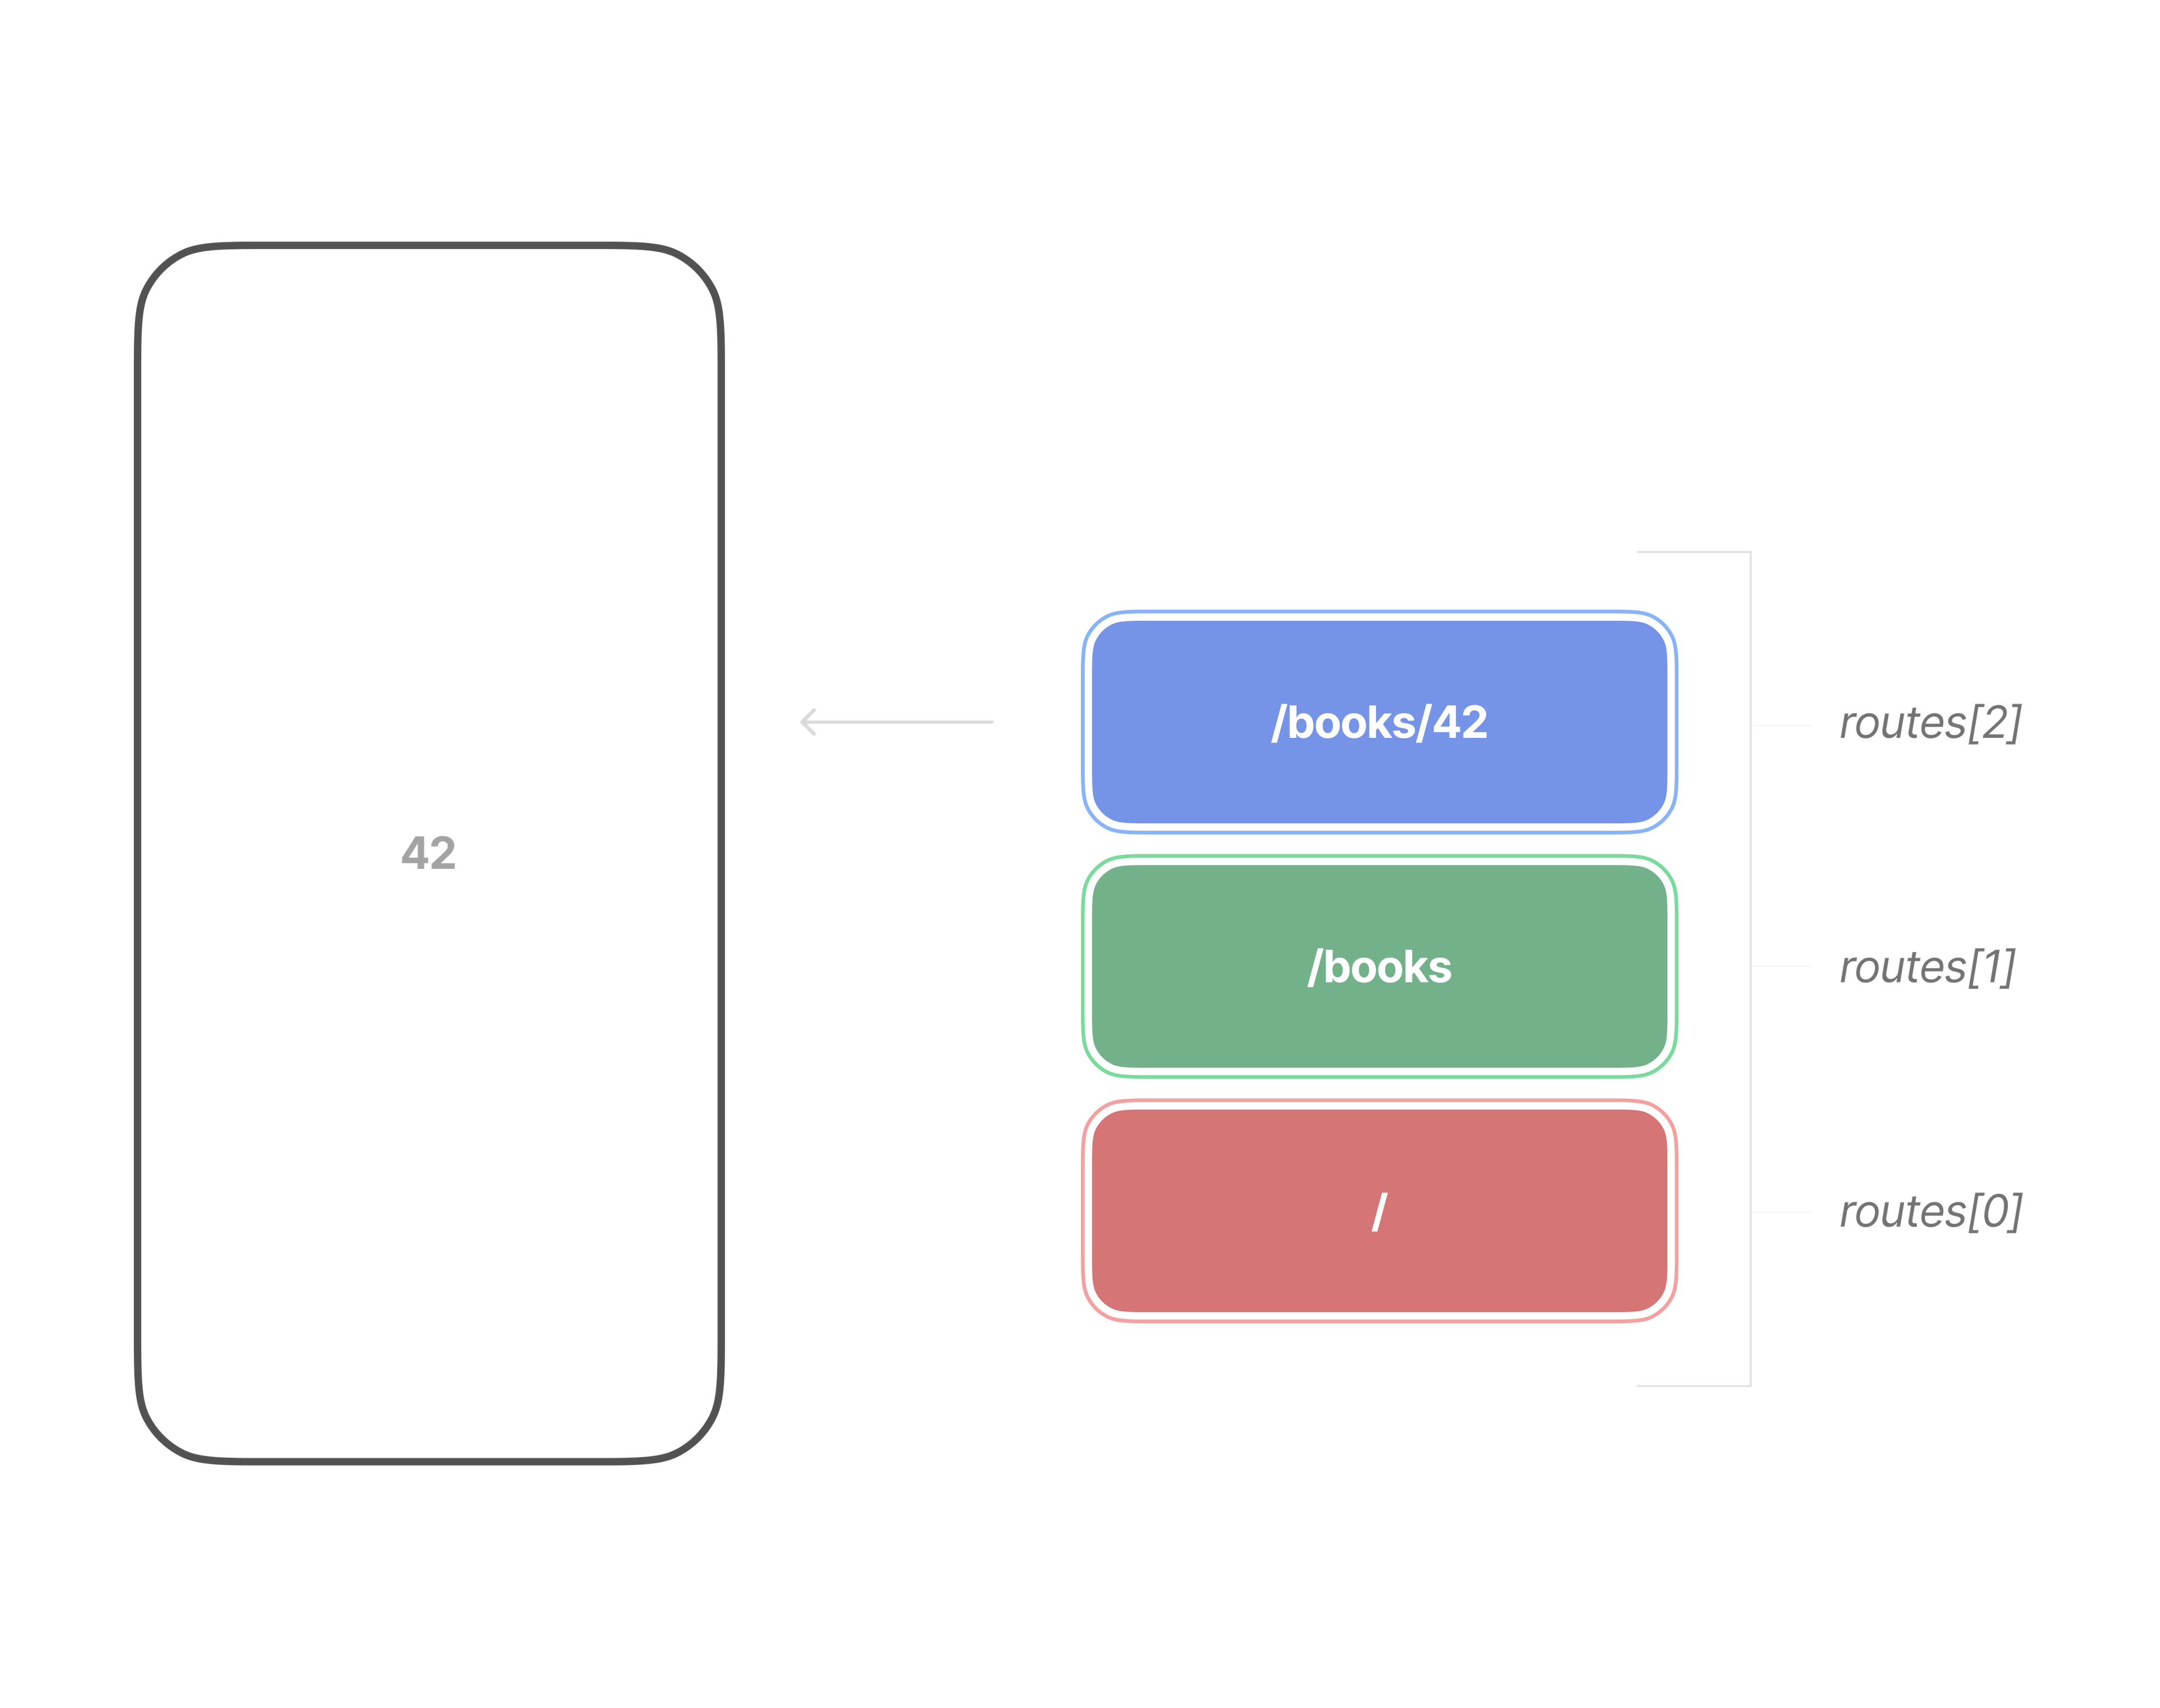
To start, we need a state variable to be the source of truth for our navigation stack and somewhere to define what is a valid path or not. Since a user can type anything they want into a search bar, your app needs to handle this by showing a default route.
For demo purposes, we will use Strings (the URLS) as our state object and source of truth. This will help keep things simple.
First, we need to define all our valid routes and include a route that we send all unknown routes to (in this case /404).
final List<String> routes = [ '/', '/books', '/settings', '/404',];Then, we need to maintain a state for the current navigation stack. You can use any state management approach that you choose, but we will use ValueNotifier (with the MVVM architecture that we teach in the Best Flutter Course). This ValueNotifier will be the source of truth for our navigation stack, and we will create a class called RouteService that will be the only place where this navigation stack can get manipulated.
class RouterService { final navigationStack = ValueNotifier<List<String>>(['/']);
void push(String path) { if (path == navigationStack.value.last) { return; }
navigationStack.value = [...navigationStack.value, path]; }
void pop() { navigationStack.value = navigationStack.value.sublist( 0, navigationStack.value.length - 1, ); }
void replaceAll(String path) { navigationStack.value = [path]; }}We initialize the stack with our home route, which for most apps should be '/'. And there will be 3 methods that we have: push, pop, and replaceAll.
I named these functions push and pop because they still represent what is happening to the navigation stack well. The route service is now imperative to make it easy to use in our app, but the logic within is still declarative.
Remember, the navigation is just a stack, so you can have any functions you want here. You are not limited to push and pop, and you can call them anything and do anything with them like removeOnlyTheThirdPage or add100RandomPagesInTheMiddle.
At this point, we have the navigation stack defined and functions to manipulate it. Now, we need to create our Page widgets from this and pass them into the Navigator within the RouterDelegate. To do this we will need access to the service. You can do this using whatever dependency injection you want. We will use a custom-built locator that is similar to get_it.
Then you build the list of pages based on the current navigation stack and pass it into the Navigator.
List<Page<dynamic>> createPages() { List<Page<dynamic>> pages = []; final navigationStack = _routerService.navigationStack.value; for (int index = 0; index < navigationStack.length; index++) { final route = navigationStack[index]; switch (route) { case '/': pages.add( MaterialPage(key: ValueKey('Page_$index'), child: HomeScreen()), ); case '/books': pages.add( MaterialPage(key: ValueKey('Page_$index'), child: BooksScreen()), );
case '/settings': pages.add( MaterialPage(key: ValueKey('Page_$index'), child: SettingsScreen()), ); case '/404': pages.add( MaterialPage(key: ValueKey('Page_$index'), child: UnknownScreen()), ); } } return pages;}We also need our RouterDelegate to listen to any updates in the navigation stack. You will notice there are a few overrides that need to be implemented when using the RouterDelegate, two of those are addListener and removeListener. The addListener function allows us to listen to navigation stack changes and update our routes, and the removeListener will stop listening once this router is no longer used.
@overridevoid addListener(VoidCallback listener) { _routerService.navigationStack.addListener(listener);}
@overridevoid removeListener(VoidCallback listener) { _routerService.navigationStack.removeListener(listener);}Now you can push and pop onto the stack, within your application! But only the push and pop methods from the routerService will work. The Navigator 1.0 pop method will not work. This is not necessarily a problem, but the default BackButton widget calls the original Navigator.of(context).pop(). You can still catch this using the onDidRemovePage method in the Navigator. Same thing with the browser back button. If either of those is pressed, this onDidRemovePage callback will be triggered and you can update your navigation stack to match.
Navigator( key: navigatorKey, pages: createPages(), onDidRemovePage: (page) { _routerService.pop(); },);The onDidRemovePage handles the back button within the application and the back button in the browser, but the system back buttons on iOS and Android are handled by the popRoute override within the RouterDelegate.
When the back button is triggered, we don’t want to remove it from our stack directly in the popRoute function. If we did that, it would remove our top route, which would trigger the onDidRemovePage, which would remove another route. Instead, if we just trigger the pop with the Navigator directly, we ensure that only the Navigator can do the pop.
But we only want to do this if our navigation stack has more than 1 item in the list because when we click the system back button on the root page, we want to pop out of the app (not handle it within our app). We let the device know that we didn’t handle the back button by returning a false. If we do handle it (like in most cases), we should return a true. And we wrap these returns in a SynchronousFuture because it’s slightly more performant.
@overrideFuture<bool> popRoute() async { if (_routerService.navigationStack.value.length > 1) { Navigator.of(navigatorKey.currentContext!).pop(); return SynchronousFuture(true); } return SynchronousFuture(false);}This has been the most confusing point when working with Navigator 2. There is a deprecated method on the Navigator called onPopPage that seems to work better than onDidRemovePage.
The onPopPage method was called only when a pop was initiated within the system. This allowed us to pop the page directly from our service, instead of needing to use the navigator context to trigger it manually.
In fact, none of the navigation frameworks have been updated to use the new method. Not even go_router, which is maintained by Flutter! There are even a few issues opened on GitHub (#153122 and #160463) that have been open for a long time related to onDidRemovePage.
There is one more override that we must handle in the RouterDelegate called setNewRoutePath. This function is called whenever the operating system pushes a new route to our application. The most common case of this would be when someone types a URL directly in the address bar. In this case, we want to use our replaceAll function to create a new stack.
@overrideFuture<void> setNewRoutePath(String configuration) async { _routerService.replaceAll(configuration);}At this point, the app should function as expected, at least on Android and iOS. If you check the web, you will notice a big issue: the URLs don’t work.
Updating URL
There is one more key part that is missing for a complete navigation system on all platforms, and that’s syncing the URL in the browser to the navigation state. Two main behaviors need to work:
- When you type a URL in the browser, it should go to that page within the app.
- When you navigate to a page within the app, it should update the URL.
To do this you will need a RouteInformationParser. The RouteInformationParser is responsible for handling both of the above behaviors and it does so using two functions.
parseRouteInformation
The parseRouteInformation function handles the path where a user types in a new URL or a deep link. The goal of this function is to convert the URL into the state that we use for navigation. In our case, the state is a String (hence the return type), and it needs to be one of the user-defined routes. I wrote a helper function called findMatchingRoutePattern that looks through available routes, and returns the string value if it’s there, or returns a 404 if it’s not.
Once this is parsed, the setNewRoutePath that we defined in the RouterDelegate is called to replace the stack with this new state.
@overrideFuture<String> parseRouteInformation( RouteInformation routeInformation,) async { final uri = routeInformation.uri; return findMatchingRoutePattern(uri.toString(), routes);}restoreRouteInformation
The restoreRouteInformation handles the other case, where some action was taken within the application that requires the URL to be updated. For this to work, we will need another override in the RouterDelegate called currentConfiguration. This gets triggered whenever the routing changes within the application.
@overrideString? get currentConfiguration { if (_routerService.navigationStack.value.isEmpty) { return null; } return _routerService.navigationStack.value.last;}The configuration returns a string type since that’s the state type of our current route. This configuration is then used to update the URL.
@overrideRouteInformation? restoreRouteInformation(String configuration) { if (configuration.isNotEmpty) { return RouteInformation(uri: Uri.parse(configuration)); }
return null;}Now we have a complete navigation system using Navigator 2.0, that is synchronized with the URL.
Recap
Everything we have covered so far is the fundamental logic of Navigator 2.0. I want to quickly summarize all of it before covering a few more topics.
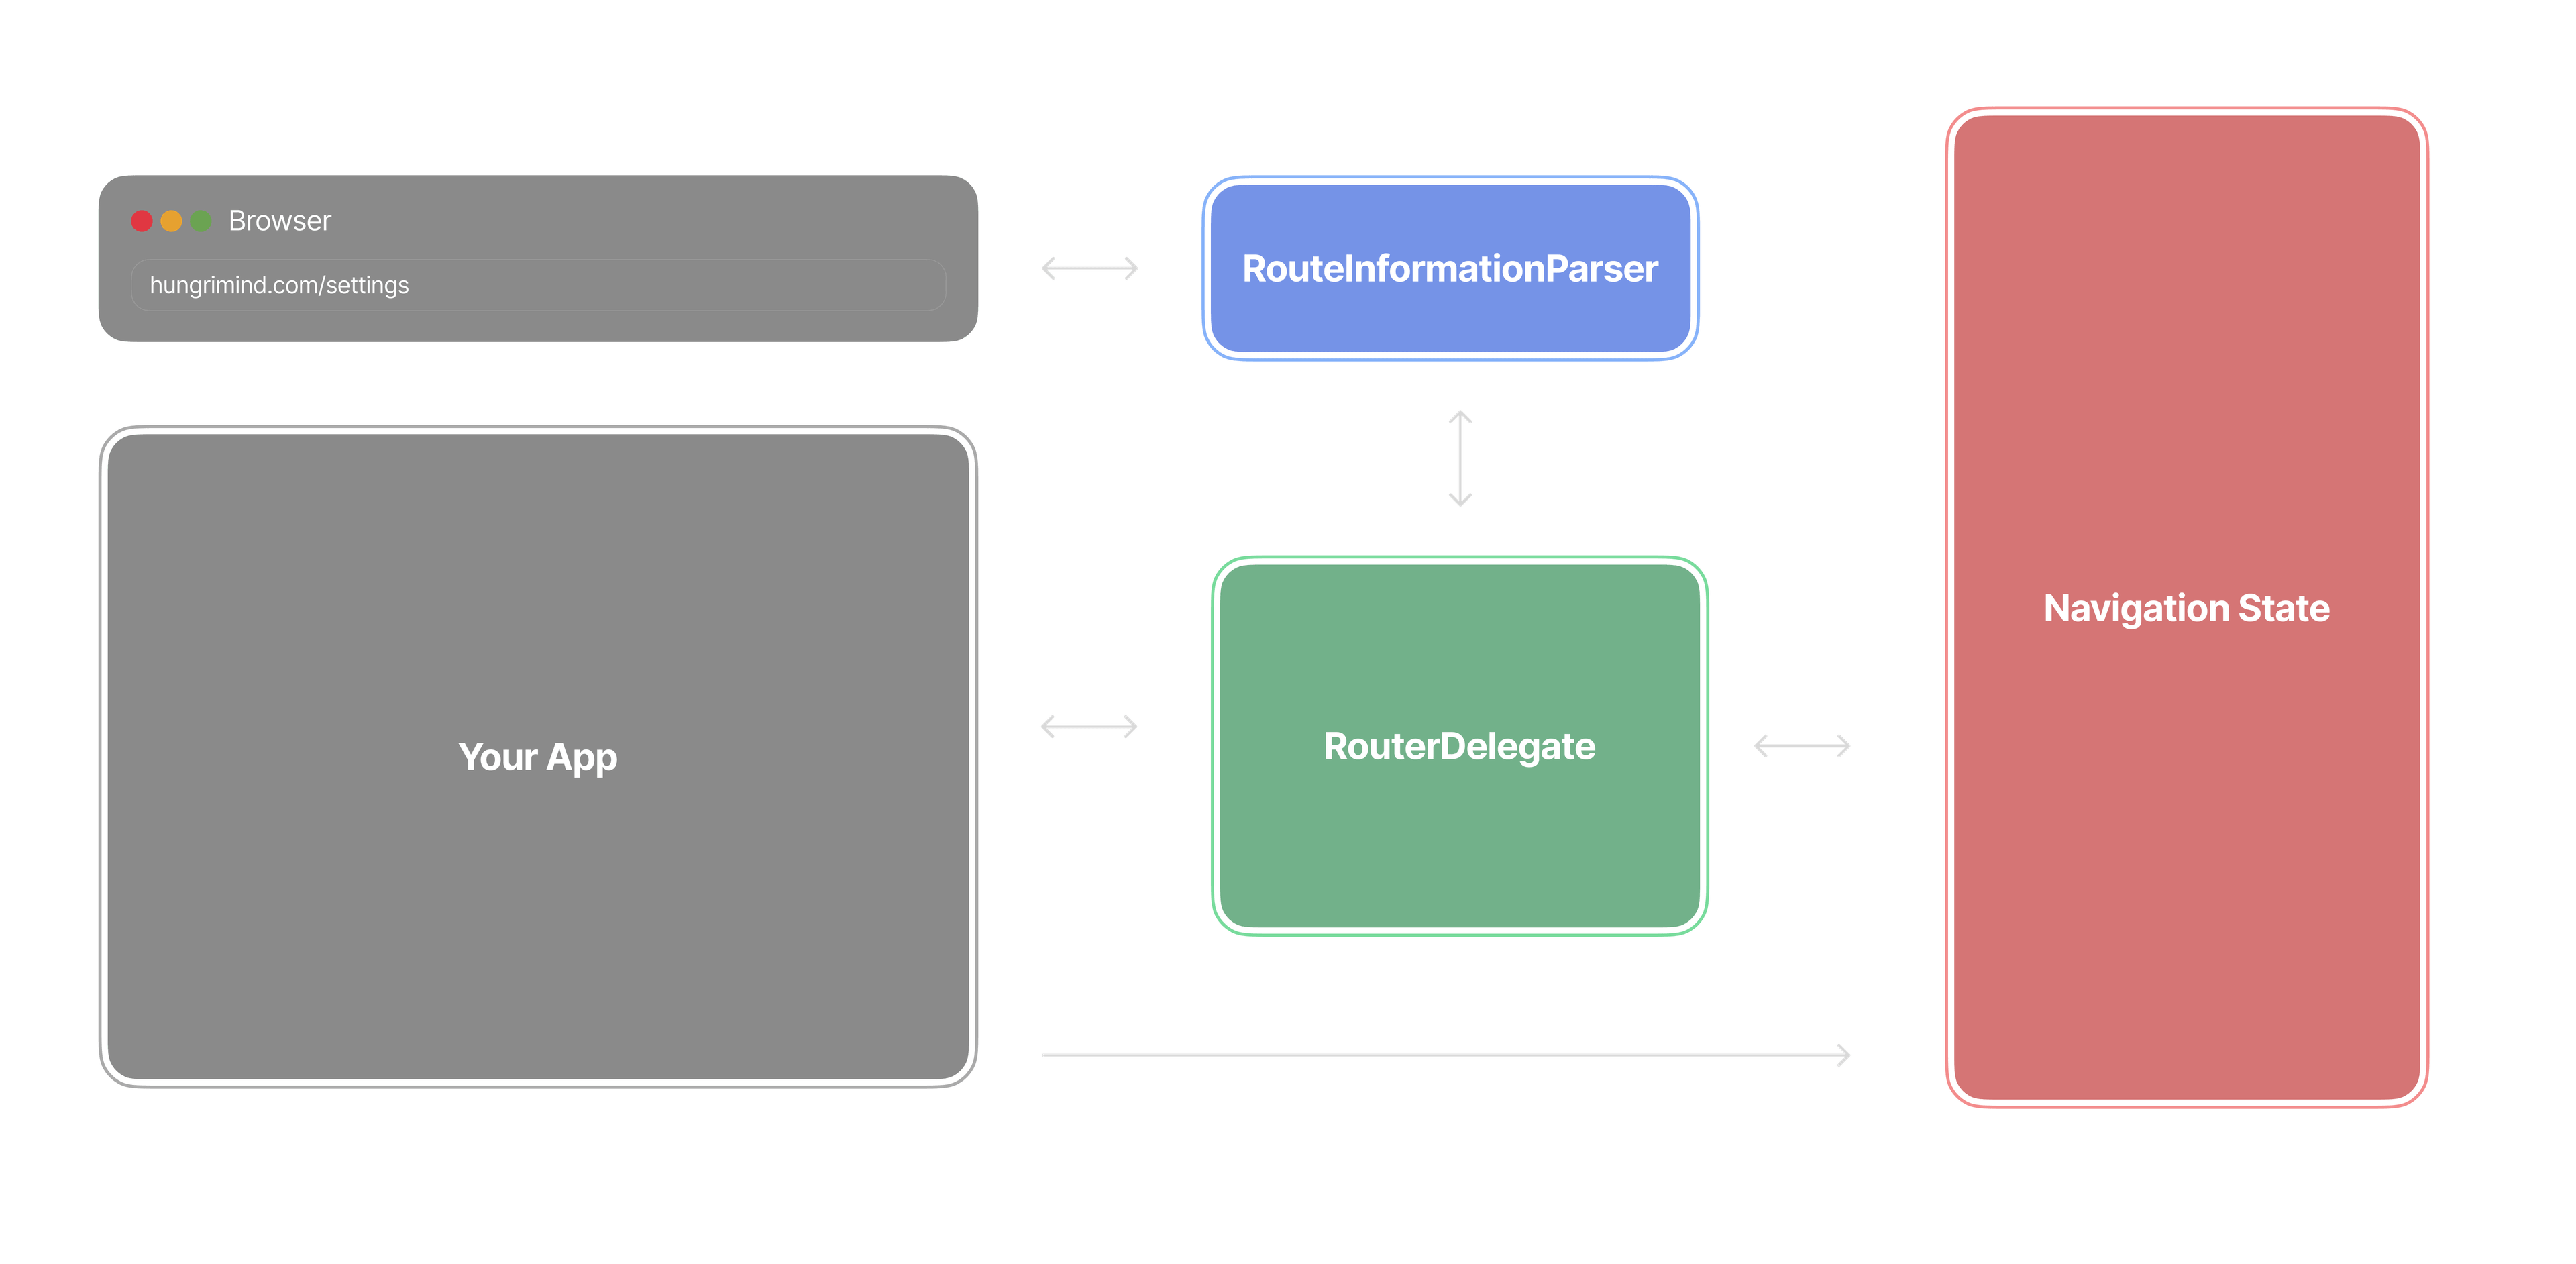
Navigator 2.0 is a declarative implementation of navigation in Flutter. What that means is that your navigation stack is defined by you. The navigation stack is a state containing a list of data that defines your routes. It is defined by you (we used Strings in our example) and you are in charge of manipulating that list. The RouterDelegate is in charge of listening to changes in this list, and building the routes (Page widgets) to be displayed for the user. The RouterDelegate also has functions that notify or give information on route changes:
onDidRemovePage(within the Navigator) - triggered whenever a page is removed from the stackpopRoute- triggered whenever the system back button is pressedsetNewRoutePath- triggered when a new URL is requested by the systemcurrentConfiguration- triggered when the app routes change
Then the RouteInformationParser has two functions to convert from URL to app state and vice versa to keep the system and app synchronized.
Dynamic Routes
Everything we have discussed until now has been using static routes, but dynamic routes are a very important piece of the puzzle, especially when working with Flutter Web.
Given all the fundamentals we learned, dynamic routes are quite easy. Remember, the navigation system is a list of routes that you define. To have dynamic routes, you need a few helper functions to check for valid paths and extract the information from the URL and vice versa.
We based our entire example on strings, which can be good enough with helper functions to extract all the data. But we use a custom RouteEntry class that has a route definition, a builder function, and helper functions to make the whole process easier.
class RouteEntry { RouteEntry({required this.path, required this.builder});
final String path; final Widget Function(ValueKey<String>? key, RouteData routeData) builder;}
class RouteData { const RouteData({ required this.uri, required this.routePattern, this.extra, });
final Uri uri; final String routePattern; final Object? extra;
String get pathWithParams => uri.toString();
Map<String, String> get queryParameters => uri.queryParameters;
Map<String, String> get pathParameters { final params = <String, String>{}; final pathSegments = uri.pathSegments; final patternSegments = getSegments(routePattern);
if (patternSegments.length != pathSegments.length) return params;
for (var i = 0; i < patternSegments.length; i++) { if (patternSegments[i].startsWith(':')) { final paramName = patternSegments[i].substring(1); params[paramName] = pathSegments[i]; } }
return params; }}And our list of available routes now looks like this:
final List<RouteEntry> routes = [ RouteEntry( path: '/', builder: (key, routeData) { return HomeScreen(); }, ), RouteEntry( path: '/books', builder: (key, routeData) { return BooksScreen(); }, ), RouteEntry( path: '/books/:bookId', builder: (key, routeData) { return BookDetailsScreen(bookId: routeData.pathParameters['bookId'] ?? ''); }, ), RouteEntry( path: '/settings', builder: (key, routeData) { return SettingsScreen(); }, ), RouteEntry( path: '/404', builder: (key, routeData) { return UnknownScreen(); }, ),];Now using this as the baseline for your routes, update the RouterDelegate and RouteInformationParser to use this data class instead of strings.
Annoying Tips
There are a few issues we ran into that Flutter should have handled better, but since they don’t here they are.
RouterConfig
We have used MaterialApp.router for this demo, and honestly, it works great. However, you should be aware that there is a new routerConfig property that you can use. It acts the same way but allows you to define all the router-related things in one place.
At the moment of this article, the router config has worse defaults than MaterialApp.router. You have to manually provide a BackButtonDispatcher and a RouteInformationProvider, while the MaterialApp.router, has nice defaults.
How to get rid of # in the URL?
In my opinion, having a hashtag in the URL of your website does not look very nice, and is not user-friendly. To remove it, import the flutter_web_plugins package that is part of the flutter library and call setUrlStrategy(PathUrlStrategy()).
This will make your URLs nice, but it will also break your native applications. So you have to use this with a conditional import, so it only gets used if you are running the web platform.
What should you use?
At this point, you understand the fundamentals of Navigator 2. So should you use it?
For me, one thing is very clear: I should not be using Navigator 1. After working with a declarative approach for navigation, it just makes so much more sense. Even if I am not building applications with Flutter Web, being able to define my navigation stack feels so freeing and opens up possibilities that I wouldn’t have considered previously, because they would be a pain to implement.
I enjoy learning about the intricacies of how the native tools work, and I enjoy not having to depend on other’s code. Because of this, I choose to work with Navigator 2 directly for my applications.
However, it is time-consuming, and there are plenty of edge cases that I am sure to run into as I keep building. For some people, this is not worth the trade-off, especially when there are already tested solutions for declarative navigation.
- go_router - maintained by flutter, but in “maintenance mode”
- auto_route - also widely used
- beamer - flutter favorite
- navigation_utils - minimal
Feedback for Flutter
I want to end this guide by addressing all the negativity that Navigator 2 has received. If anyone from the Flutter team reads this, here’s an outsider’s perspective of what went wrong and what could have been done better.
It’s very clear that navigation is a hard topic, and I can only imagine how difficult even getting to this solution must have been. The biggest complaint the community had was complexity, and yes, declarative navigation that supports both apps and websites was always going to be more complex, but there have been defaults provided since the initial release that reduced this complexity significantly. And the biggest complexity seems to come from still supporting Navigator 1.0.
After learning about Navigator 2.0, it’s very clear that it solves real issues that Navigator 1.0 had, and now Navigator 1.0 seems like unnecessary bloat. Yes, a full transition away from 1.0 would have been annoying, but the end state would have been much simpler.
And lastly, my biggest complaint is that it doesn’t seem like the team tried very hard to educate the community on Navigator 2.0. The reason I was compelled to write this massive guide is because of how difficult it was to find any resources explaining Navigator 2.0. Generally, the docs are incredible, and I use them to learn so much about Flutter, but the effort when it comes to navigation seems lackluster.
At the current state (4 years since Nav 2) release, you would not know Flutter can even support a browser back button or URL syncing from the documentation. And definitely not how to do it.
Keep Learning
This guide covered most of the concepts that you need to know to get started with Navigator 2.0. Navigator 2.0 does go way deeper and you will need more upgrades to what we built here as your apps expand. Here are some of the things we’ve added to our navigation system:
- A
canPopto each page - Route definitions containing a builder to make dynamic links simpler
- The navigation stack is a custom object containing helper functions and more information about the route
- More functions for manipulating the navigation stack
- A navigation observer, so you can use this with your analytics tooling
- Lots of helper functions to clean up the code
You can find the demo code in the sidebar, and if you want to see the full implementation that we use to build production-ready applications you can find it in our Flutter Boilerplate.
If you enjoyed this guide, you will enjoy this other guide how we implement MVVM Architecture in our production applications.
Get Articles in Your Inbox
Sign up to get practical tutorials and production patterns delivered to your inbox.