Theming in Flutter can be difficult. Oftentimes, you might want to define app specific colors to access later. You can do this using theme extensions.

Theme Extension
Let’s create a theme extension for the neutral colors from Tailwind, to be used within our app.
After that implementation we will dive into how theme extensions actually work.
To keep it organized, we start by defining the neutral colors is their own class. This class will be our source of truth for all colors in the application. These colors will be for light mode, and for dark mode we will simply invert the values.
We also use static colors, we can also use them directly if we want.
class NeutralColorValues { const NeutralColorValues();
static const neutral50 = Color(0xFFFAFAFA); static const neutral100 = Color(0xFFF5F5F5); static const neutral200 = Color(0xFFE5E5E5); static const neutral300 = Color(0xFFD4D4D4); static const neutral400 = Color(0xFFA3A3A3); static const neutral500 = Color(0xFF737373); static const neutral600 = Color(0xFF525252); static const neutral700 = Color(0xFF404040); static const neutral800 = Color(0xFF262626); static const neutral900 = Color(0xFF171717); static const neutral950 = Color(0xFF0A0A0A);}Create your ThemeExtension
Next step is defining our ThemeExtension. By creating a ThemeExtension, we will be able to access these colors throughout the app using the theme inherited widget.
We create a class named NeutralColors that extends ThemeExtension. Then we can access this later through the Theme inherited widget.
This ThemeExtension sets up all our colors for the neutral color spectrum from Tailwind and defines the light and dark mode version.
Dark mode in this case just inverts the colors.
@immutableclass NeutralColors extends ThemeExtension<NeutralColors> { final Color neutral50; ...
const NeutralColors({ required this.neutral50, ... });
static const light = NeutralColors( neutral50: NeutralColorValues.neutral50, ... );
// inverted neutral colors static const dark = NeutralColors( neutral50: NeutralColorValues.neutral950, ... );
/// copyWith
@override ThemeExtension<NeutralColors> lerp( covariant ThemeExtension<NeutralColors>? other, double t, ) { if (other is! NeutralColors) { return this; } return NeutralColors( neutral50: Color.lerp(neutral50, other.neutral50, t)!, ... ); }}We create our extension object using the brightness to figure out if we want to generate the dark or light version of the neutral colors.
Within the ThemeData you have a property for extensions., Here you would pass the neutral colors extension.
class AppTheme { static ThemeData buildTheme(Brightness brightness) { final isDark = brightness == Brightness.dark;
// here we define the dark or light mode version of the extension final neutralColors = isDark ? NeutralColors.dark : NeutralColors.light;
return ThemeData( brightness: brightness, colorScheme: ColorScheme( brightness: brightness, surface: neutralColors.neutral100, primary: neutralColors.neutral950, onPrimary: neutralColors.neutral50, secondary: neutralColors.neutral950, onSecondary: neutralColors.neutral50, ... ), scaffoldBackgroundColor: neutralColors.neutral50, appBarTheme: AppBarTheme( backgroundColor: neutralColors.neutral100, foregroundColor: neutralColors.neutral950, ), // EXTENSION PASSED HERE extensions: [ neutralColors, ], ); }}How do you access the colors?
How you would go about accessing those colors now in your UI?
Maybe your buttons background should be using neutral200 for light mode and neutral800 for dark mode.
You access this through the Theme.
Now using the neutral colors theme extension we have automatic light and dark mode support for the neutral color spectrum.
What if you have a component that should always be a static color independent of light or dark mode?
Widget build(BuildContext context) { final neutralColors = Theme.of(context).extension<NeutralColors>(); // ... now we can use neutralColors.neutral200 // In light mode this will be neutral200 // in dark mode it will be the inverse, which means it will be neutral800.}If you remember from earlier, we defined a NeutralColorValues class which is the source of truth for our neutral colors.
This can be used directly if you need the static color rather than the automatic dark and light mode switching.
Widget build(BuildContext context) { final neutral200 = NeutralColorValues.neutral200; // access through the static property}That is all for how to implement custom colors with ThemeExtensions.

How does it work?
but let’s also dive in to how it actually works.
Let’s start with just the ThemeExtension itself. This is the class we inherit when creating our ThemeExtensions.
It’s just a basic interface, or in Dart language an abstract class. This enforces the implementation to follow a specific structure for creating a ThemeExtension.
abstract class ThemeExtension<T extends ThemeExtension<T>> { /// Enable const constructor for subclasses. const ThemeExtension();
/// The extension's type. Object get type => T;
/// Creates a copy of this theme extension with the given fields /// replaced by the non-null parameter values. ThemeExtension<T> copyWith();
/// Linearly interpolate with another [ThemeExtension] object. /// /// {@macro dart.ui.shadow.lerp} ThemeExtension<T> lerp(covariant ThemeExtension<T>? other, double t);}Why the abstract class?
The abstract class allows Flutter to make sure that all the implementations of ThemeExtension follows the same blueprint. In other languages it’s also referred to as an Interface .
Let’s take a look at an example why this is important.
If we take a look at the factory ThemeData class you will notice how it has the property extensions .
This is a simple Iterable of the previous mentioned ThemeExtension abstract class.
factory ThemeData({ // ... Iterable<ThemeExtension<dynamic>>? extensions, // ...}If you remember in the ThemeExtension class we also have a copyWith and lerp method.
abstract class ThemeExtension<T extends ThemeExtension<T>> { /// Enable const constructor for subclasses. const ThemeExtension();
/// The extension's type. Object get type => T;
/// Creates a copy of this theme extension with the given fields /// replaced by the non-null parameter values. ThemeExtension<T> copyWith();
/// Linearly interpolate with another [ThemeExtension] object. /// /// {@macro dart.ui.shadow.lerp} ThemeExtension<T> lerp(covariant ThemeExtension<T>? other, double t);}Build your first Flutter app in 2 minutes
Complete our free lessons and see your Flutter app running in the browser.
Demo the courseLerp and copyWith?
So what is the copyWith and lerp implementations for?
ThemeExtension<T> copyWith(); ThemeExtension<T> lerp(covariant ThemeExtension<T>? other, double t);If you are unfamiliar with copyWith, it allows you to create a new instance of the object you already have by copying and override certain fields.
When using the copyWith you will maintain all the other fields which you didn’t include in your copyWith method call.
/// Having copyWithfinal updatedFlutterCourse = flutterCourse.copyWith(name: 'Best Flutter Course');
print(updatedFlutterCourse.name); // Best Flutter Courseprint(updatedFlutterCourse.url); // hungrimind.com
/// Without copyWithfinal updatedTheme = FlutterCourse( name: 'Best Flutter Course', url: 'hungrimind.com',);Theming in Flutter uses this approach by default, hence why you can update small parts of your theme with copyWith.
final colorScheme = ColorScheme( brightness: brightness, surface: neutralColors.neutral100, primary: neutralColors.neutral950, onPrimary: neutralColors.neutral50, secondary: neutralColors.neutral950, onSecondary: neutralColors.neutral50, error: Colors.red.shade400, onError: neutralColors.neutral50, onSurface: neutralColors.neutral950, surfaceTint: neutralColors.neutral100,);
final updatedColorScheme = colorScheme.copyWith(error: Colors.red.shade300);Now what about lerp, what is that and why is it neededfor the ThemeExtension we created?
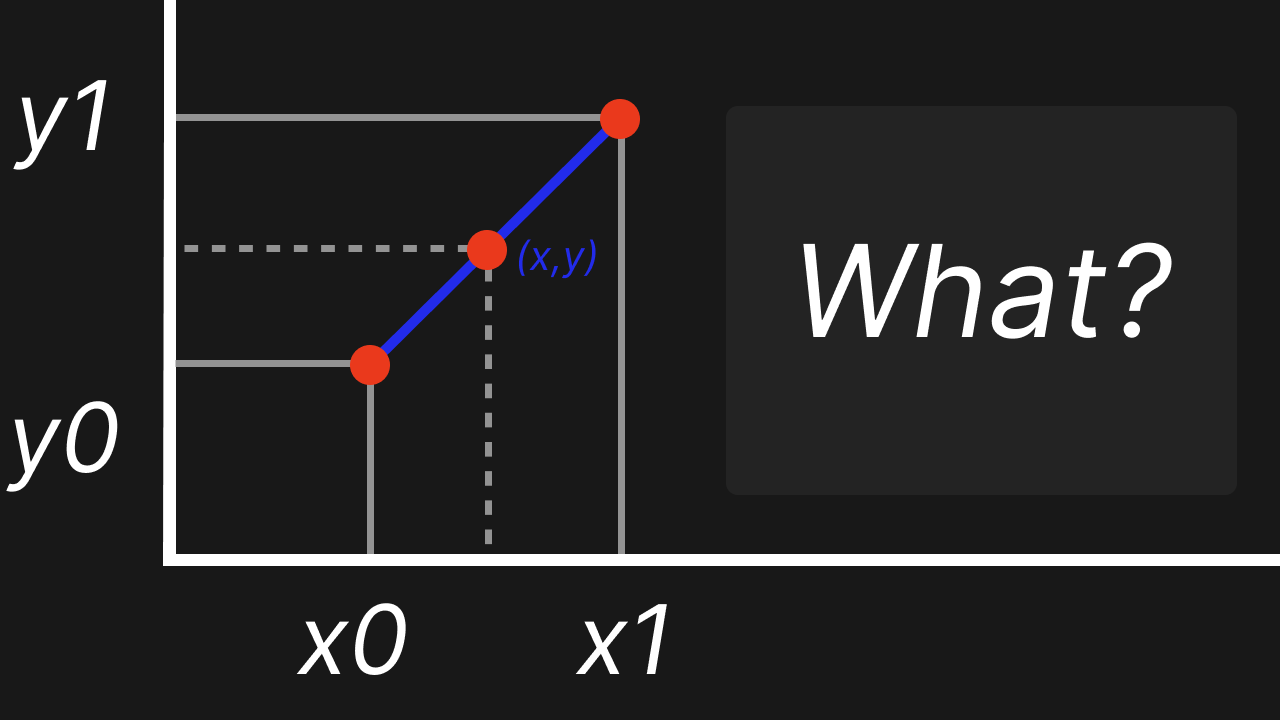
/// Linearly interpolate with another [ThemeExtension] object.////// {@macro dart.ui.shadow.lerp}ThemeExtension<T> lerp(covariant ThemeExtension<T>? other, double t);lerp other wise known as linear interpolation, calculates a smooth transition between two values (in this case themes and colors) by blending them proportionally based on a t value between 0 (start) and 1 (end).
With the context of Flutter themes, you can see linear interpolation working when you switch between light and dark mode. There is a transition period for all the colors when that switch happens.
A last remark is that within the ThemeData, all the extensions we pass are added to a Map.
Because of this we have the simplified syntax of using the type to access the specific extension on the theme.
Widget build(BuildContext context) { final neutralColors = Theme.of(context).extension<NeutralColors>();}
/// inside the ThemeDatafinal Map<Object, ThemeExtension<dynamic>> extensions;T? extension<T>() => extensions[T] as T?;Thank you for reading!