The Definitive Guide to our MVVM Architecture in Flutter
Architecture in Flutter can be complex, with many approaches to choose from. Some of these include:
- Clean Architecture
- MVP, or Model View Presenter
- MVC, or Model View Controller
- MVVM, or Model View ViewModel


While there are many different types of architectures, you don’t need to focus on all of them. You can choose one architecture, ship products, and enjoy your development life.
We believe the best architecture to choose for Flutter is MVVM, which is also the recommended architecture by the Flutter team.
Model-View-ViewModel
MVVM is flexible, scalable, and easy to understand. Once you’ve built a few projects with it, you’ll be shipping apps faster than most developers.
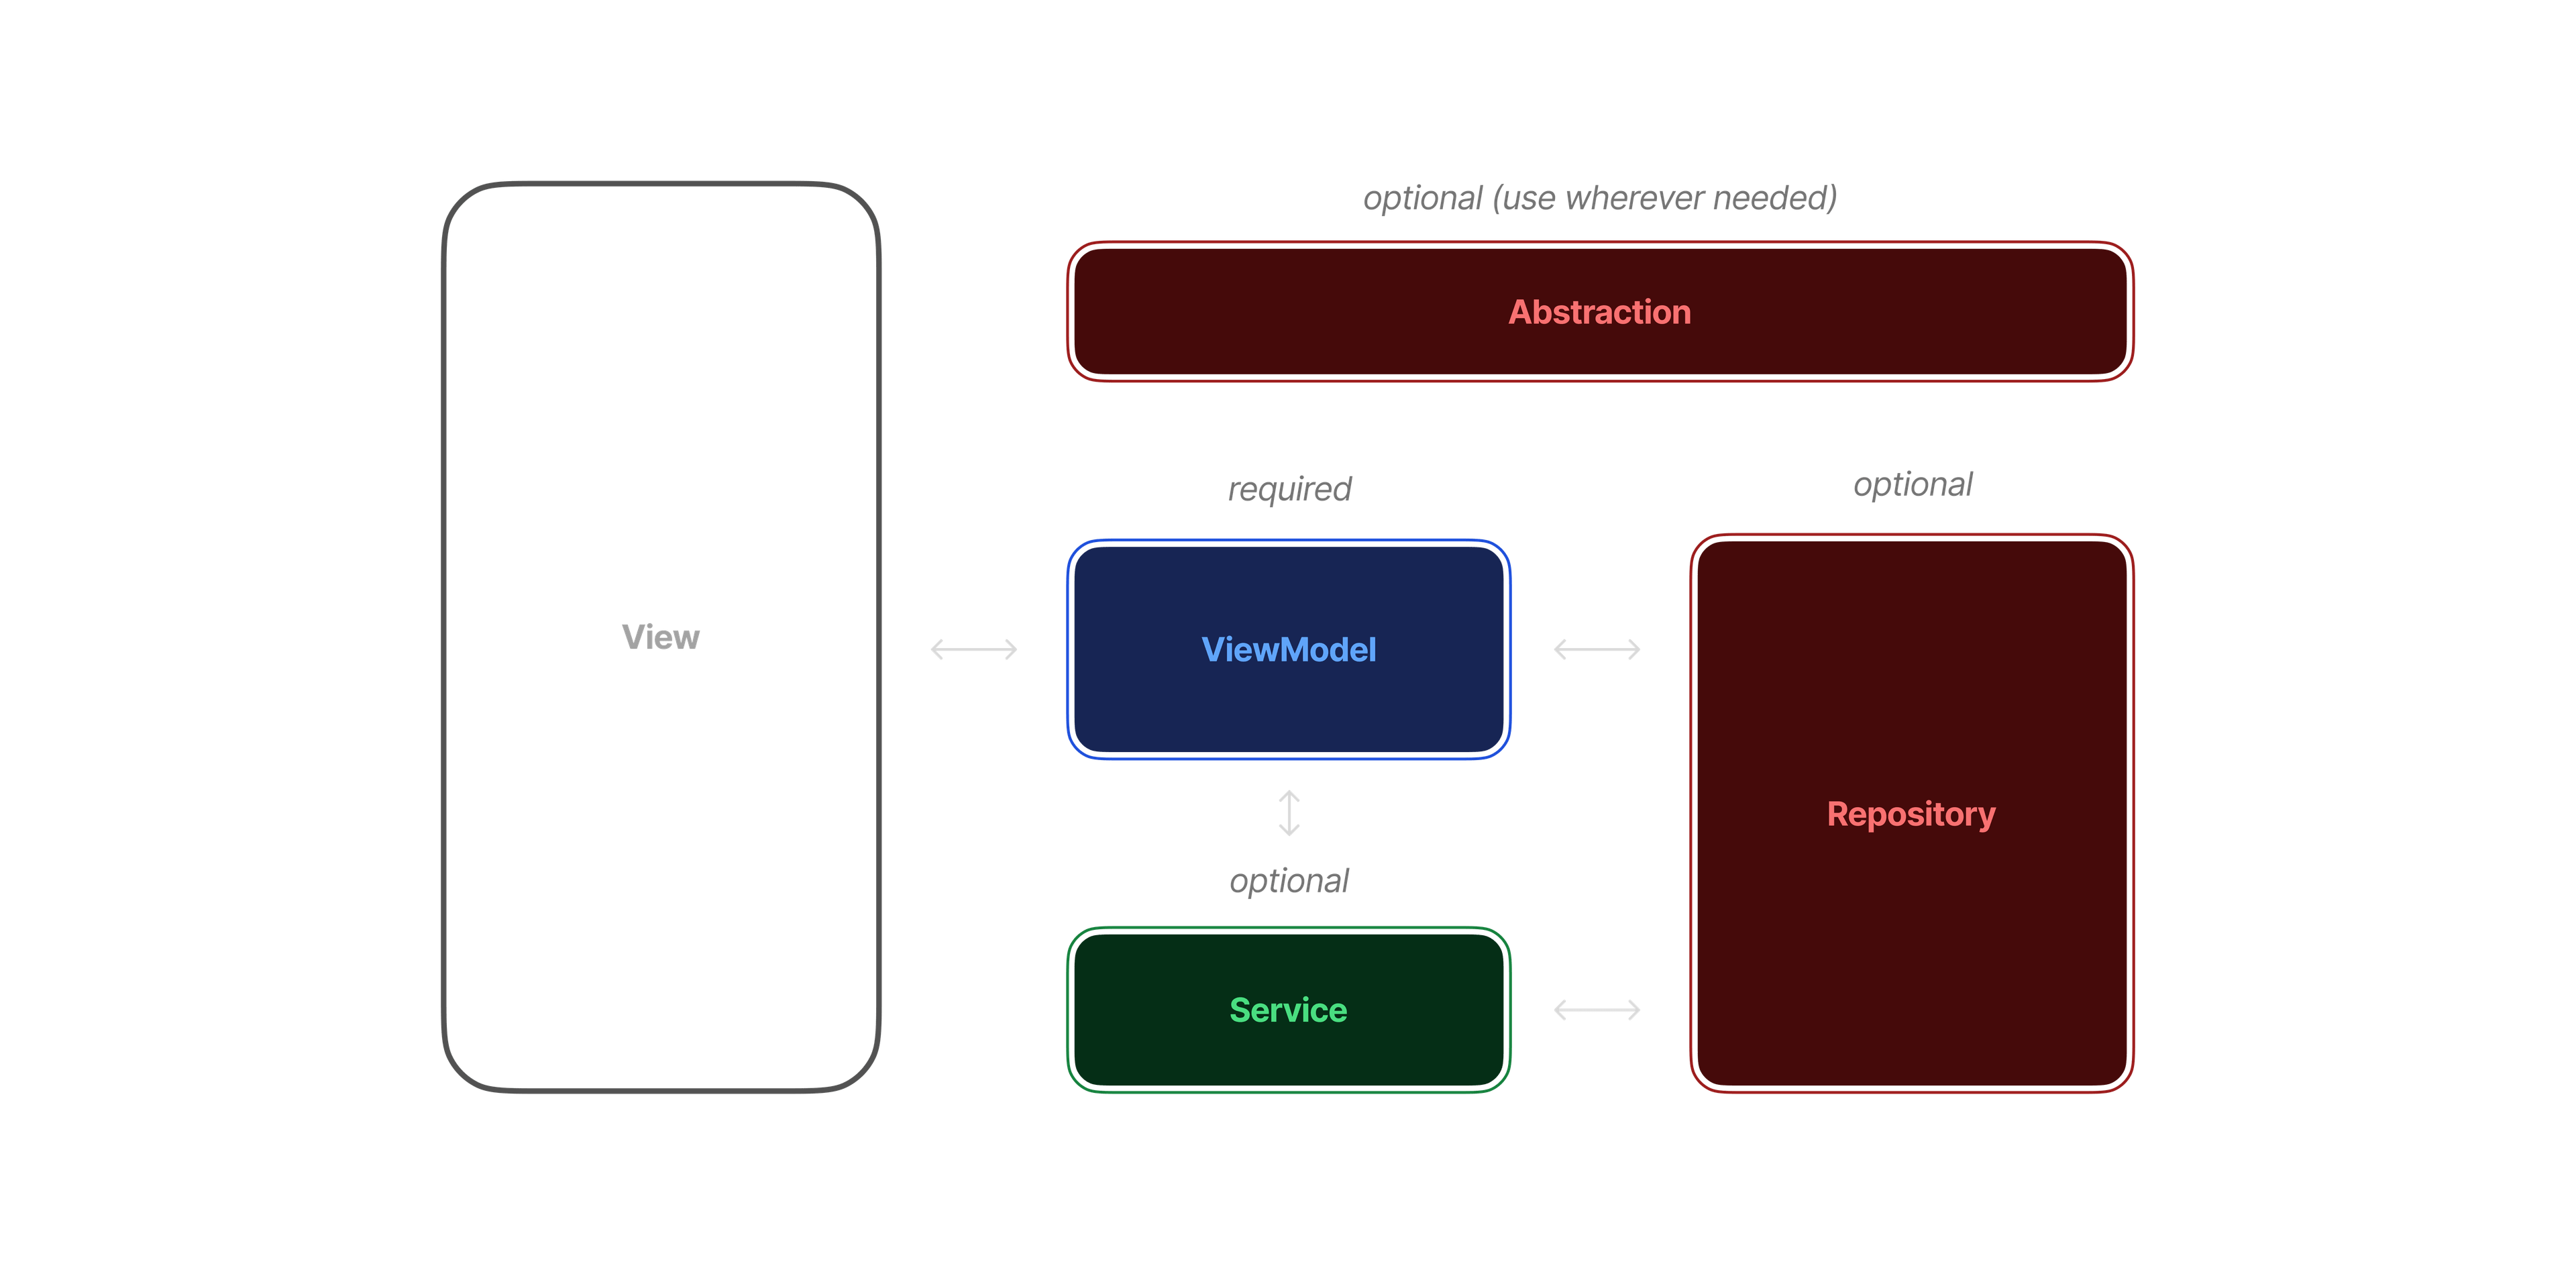
We’re going to start off with what we call the minimal MVVM architecture and build up to all the pieces you would need if you were building enterprise applications. If you are working by yourself, you should start with the minimal approach and then move up in complexity as your app grows.
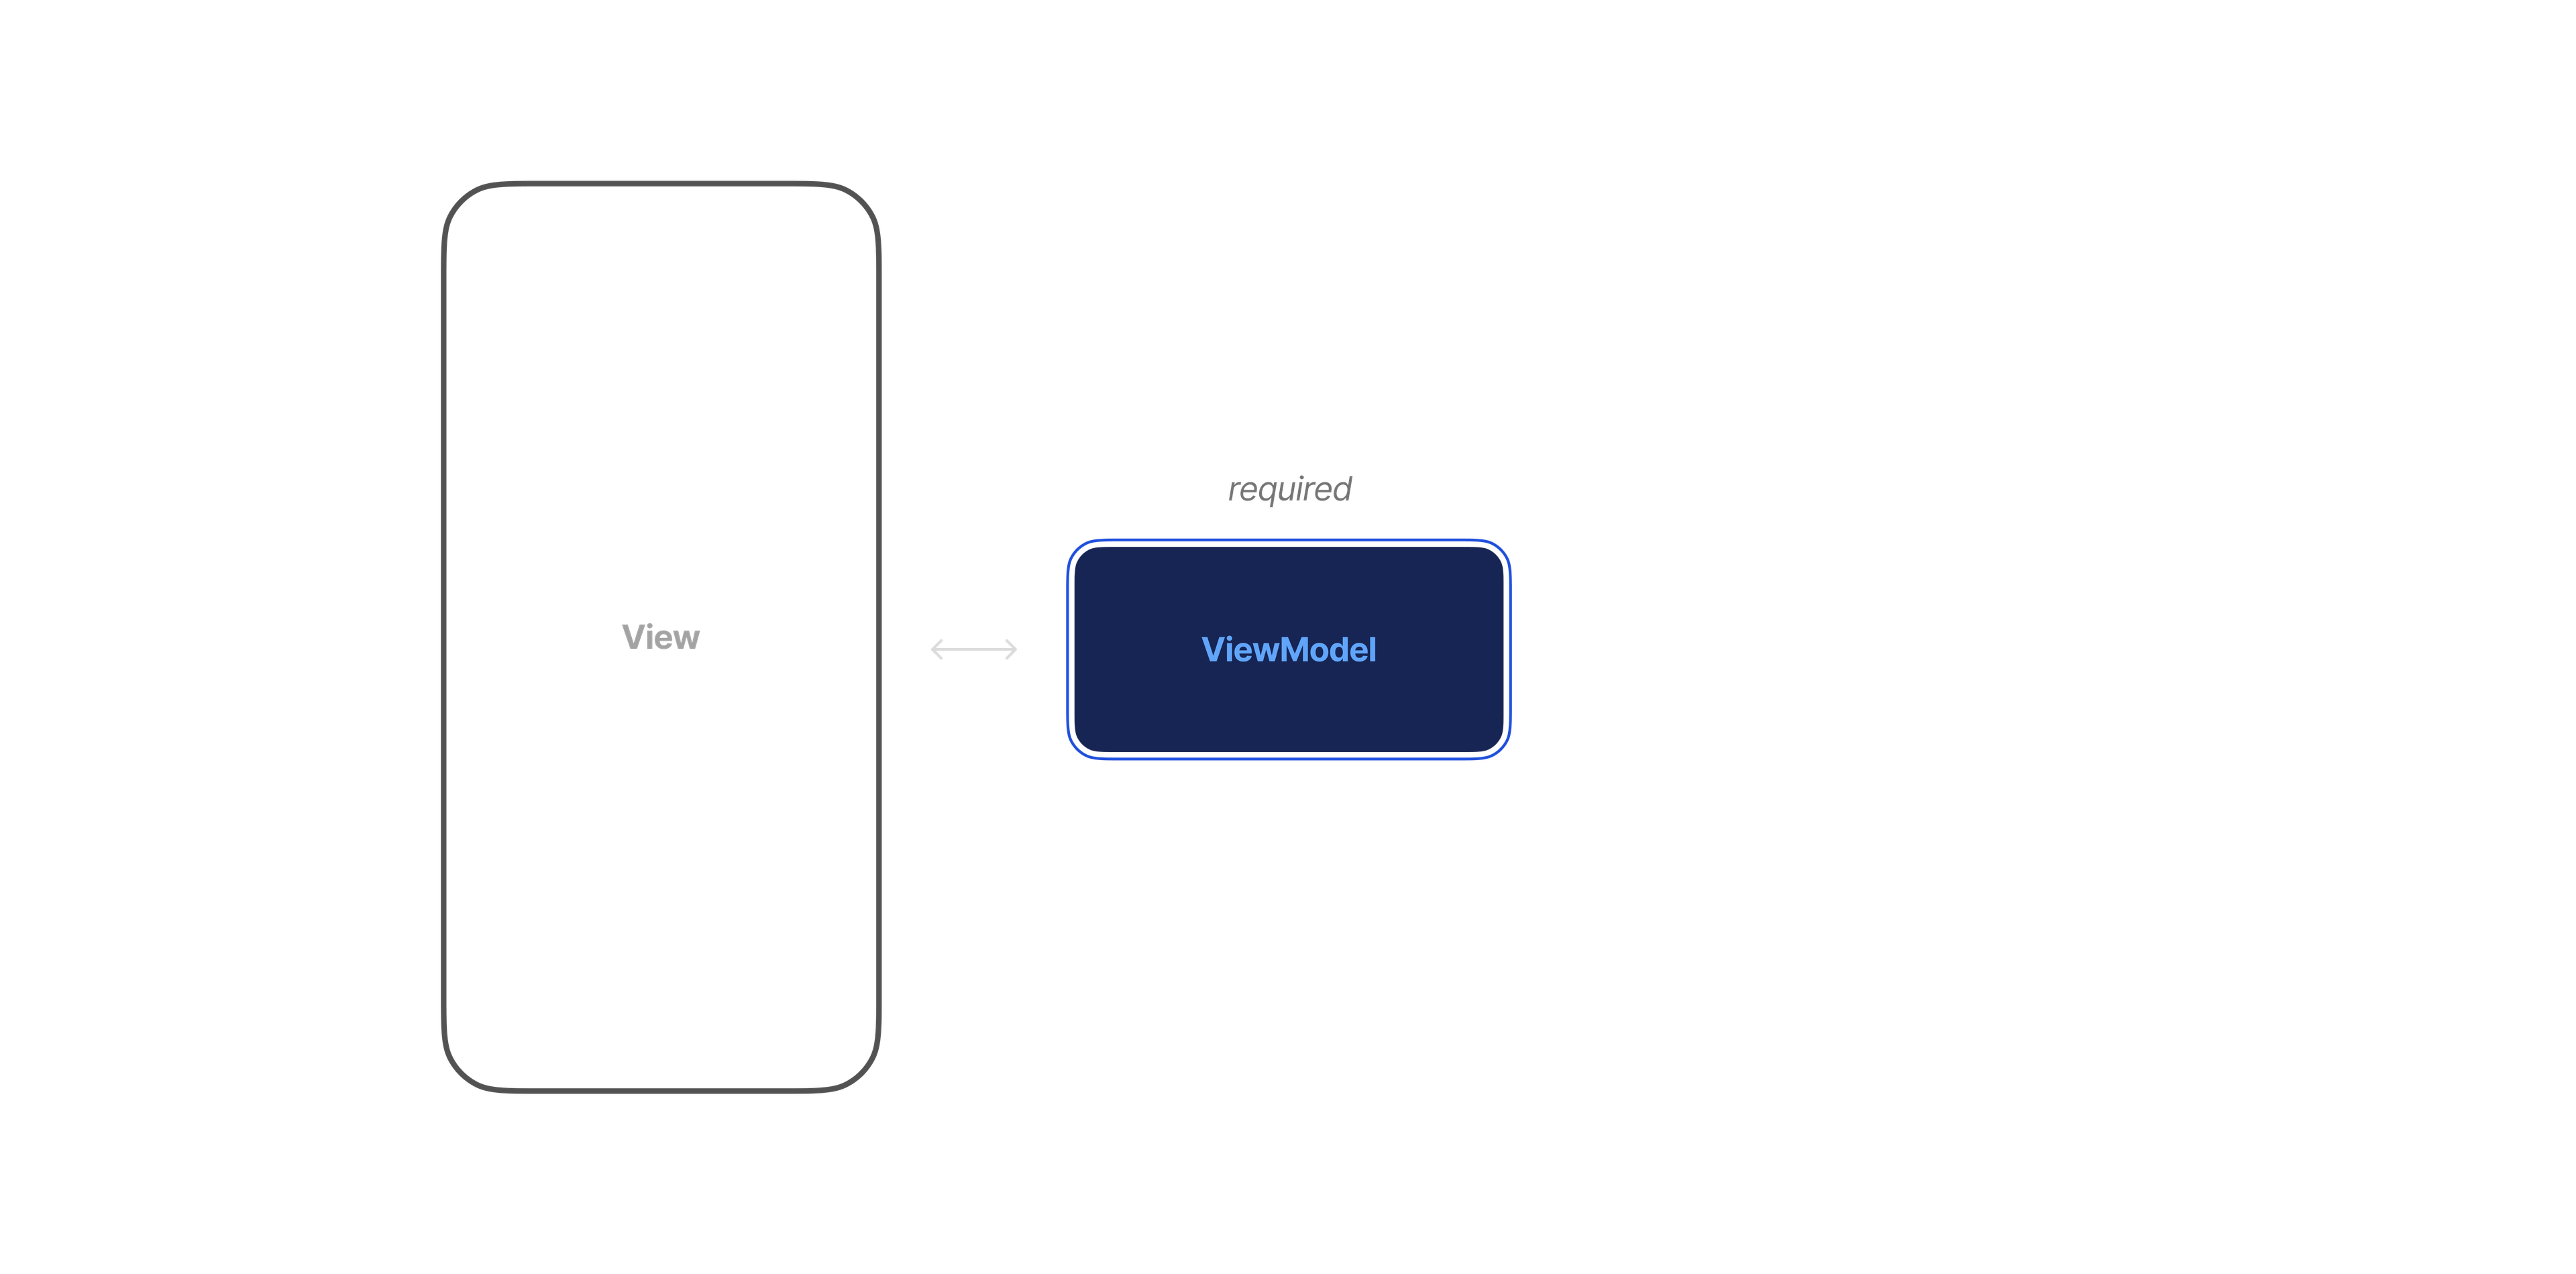
The minimal approach is just the VVM part, which refers to the view and view model. It’s the smallest architecture you can have, and sometimes it’s all you really need.
View
The view is the most familiar part. It’s the UI, what you see and display to the end user. In MVVM, the view should not handle any business logic.
What is business logic?
This phrase is commonly used to describe any logic that determines how your app functions and how the data should be updated.
It’s called business logic because all the logic in your app should only be added if it’s a requirement from the business.
Let’s go through the simplest counter app example. What is the business logic here?
int _counter = 0;
void _incrementCounter() { setState(() { _counter++; });}
@overrideWidget build(BuildContext context) { return Scaffold( floatingActionButton: FloatingActionButton( onPressed: _incrementCounter, child: const Icon(Icons.add), ), );}The business logic is incrementing the counter value.
Can you imagine working for a company and adding a counter to an application without anyone asking for it? You wouldn’t, because that is business logic and should be defined as a requirement for the application.
So where does the business logic go?
ViewModel
This is the key concept in the MVVM framework. Each View has its own ViewModel. All the business logic is stored in the ViewModel, and the View is reactive to the data changes in the ViewModel.
class CounterViewModel { final ValueNotifier<int> counter = ValueNotifier(0);
void increment() { counter.value = counter.value + 1; }}This is called one-way data-binding because our view is bound to the view model.
How do you bind that data to ensure the view is updated whenever the view model changes?
This is where the highly contested Flutter state management debate comes in. There are many packages available, but we believe in using the built-in Flutter tooling.

Using the built-ins is the best way to do it. You don’t have to rely on someone else’s code, learn any additional widgets, and you won’t have to worry about future updates to those packages.
By using Flutter tooling, you remove an extra layer of complexity.
In Flutter, there are two main options for this:
ChangeNotifierwith aListenableBuilderValueNotifierwith aValueListenableBuilder
The ListenableBuilder widgets are used within your View component to “listen” to changes in the data. In the counter app example, we would listen for changes to the counter value, and when it changes, we update the widgets within the ListenableBuilder or ValueListenableBuilder.
final CounterViewModel _counterViewModel = CounterViewModel();
@overrideWidget build(BuildContext context) { return Scaffold( body: ValueListenableBuilder( valueListenable: _counterViewModel.counterNotifier, builder: (context, count, child) => Text(count.toString()), ), floatingActionButton: FloatingActionButton( onPressed: _counterViewModel.increment, tooltip: 'Increment', child: const Icon(Icons.add), ), );}The difference between the notifiers is that with ChangeNotifier, you have to manually call a function named notifyListeners that lets the ListenableBuilder know it needs to rebuild.
class CounterViewModel extends ChangeNotifier { int value = 0;
void increment() { value++; notifyListeners(); // called manually }}Whereas ValueNotifier automatically notifies whenever the value is reassigned.
We prefer ValueNotifier because it reduces complexity.
class CounterViewModel { final ValueNotifier<int> counterNotifier = ValueNotifier(0);
void increment() { // automatically notifies counterNotifier.value = counterNotifier.value + 1; }}Let’s continue with this counter example. To follow the View-ViewModel approach, we would move the incrementCounter method into the ViewModel and create a ValueNotifier for the counter. When displaying the counter value, we would wrap that in a ValueListenableBuilder.
class CounterViewModel { final ValueNotifier<int> counterNotifier = ValueNotifier(0);
void increment() { counterNotifier.value = counterNotifier.value + 1; }}
// in a view you wouldValueListenableBuilder( valueListenable: counterViewModel.counterNotifier, builder: (_, count, __) => Text('ValueNotifier: $count'),),Now your app should work exactly as it did before, but it’s using MVVM.
Let’s take a little break here.
This sounds a little complicated. And for a counter app it totally is. However, once you understand this part, you grasp the core concept of MVVM, and everything from there is just building on top of it. Once you feel comfortable with what we’ve discussed, you can focus on building apps without needing to learn anything else.
Service
Now we move onto the next stage and add more complexity to our MVVM application.
ViewModels are tied to only one view. Apps with only ViewModels can be limiting. To handle app-wide state, we introduce what we call a service.
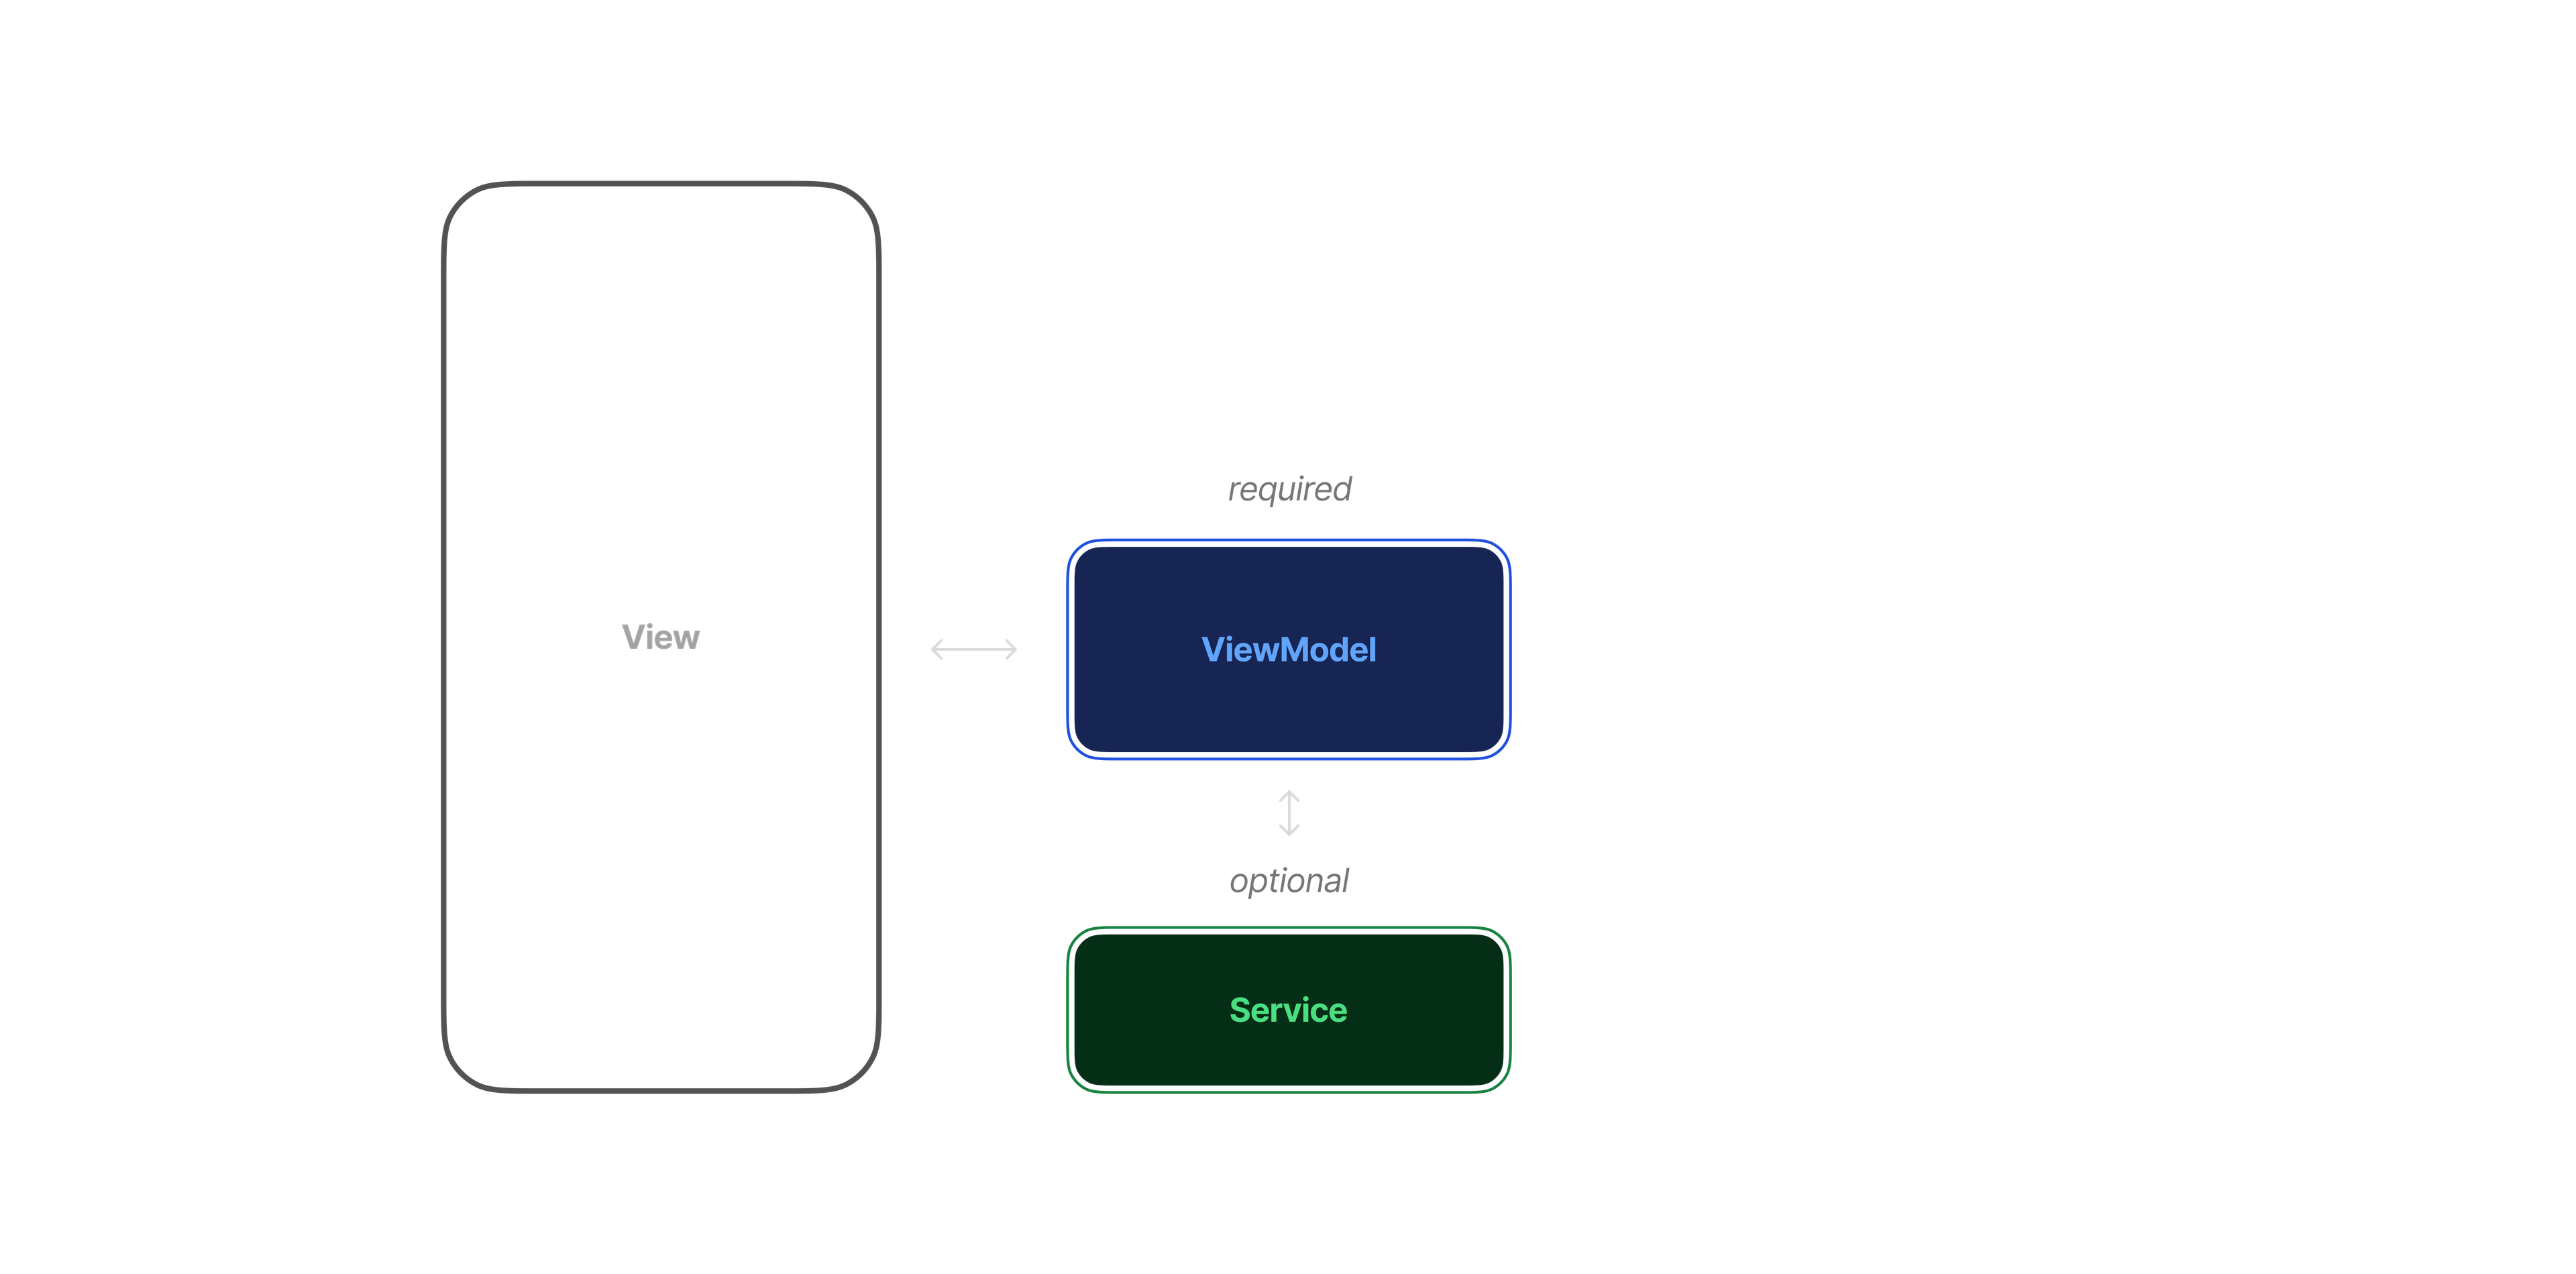
Services are similar to ViewModels, but they are not tied to any view. You have this service layer managing your app-wide state and functions that can update it, which you inject into the ViewModel whenever needed.
So let’s build upon our counter application. We want users to sign in and have their own individual counters. This requires a user state maintained throughout the application.
We would put this user state within a service and expose it through the ViewModels as needed.
class UserService { final ValueNotifier<User?> userNotifier = ValueNotifier(null);
void create(String email) { // some precondition logic that gives us our user userNotifier.value = newUser; }}
class CounterViewModel { CounterViewModel({required UserService userService}) : _userService = userService; final UserService _userService;
get userNotifier => _userService.userNotifier; final ValueNotifier<int> counterNotifier = ValueNotifier(0);
void increment() { counterNotifier.value = counterNotifier.value + 1; }}We’re now incorporating authentication into our app, increasing our complexity even further. This will require a backend outside of our application.
Abstraction
This brings us to the initial M of MVVM. The M stands for Model, representing the data layer of our applications.
For services outside our application, we like to use what we call abstractions. An abstraction acts as a middle-man between your codebase and external services.
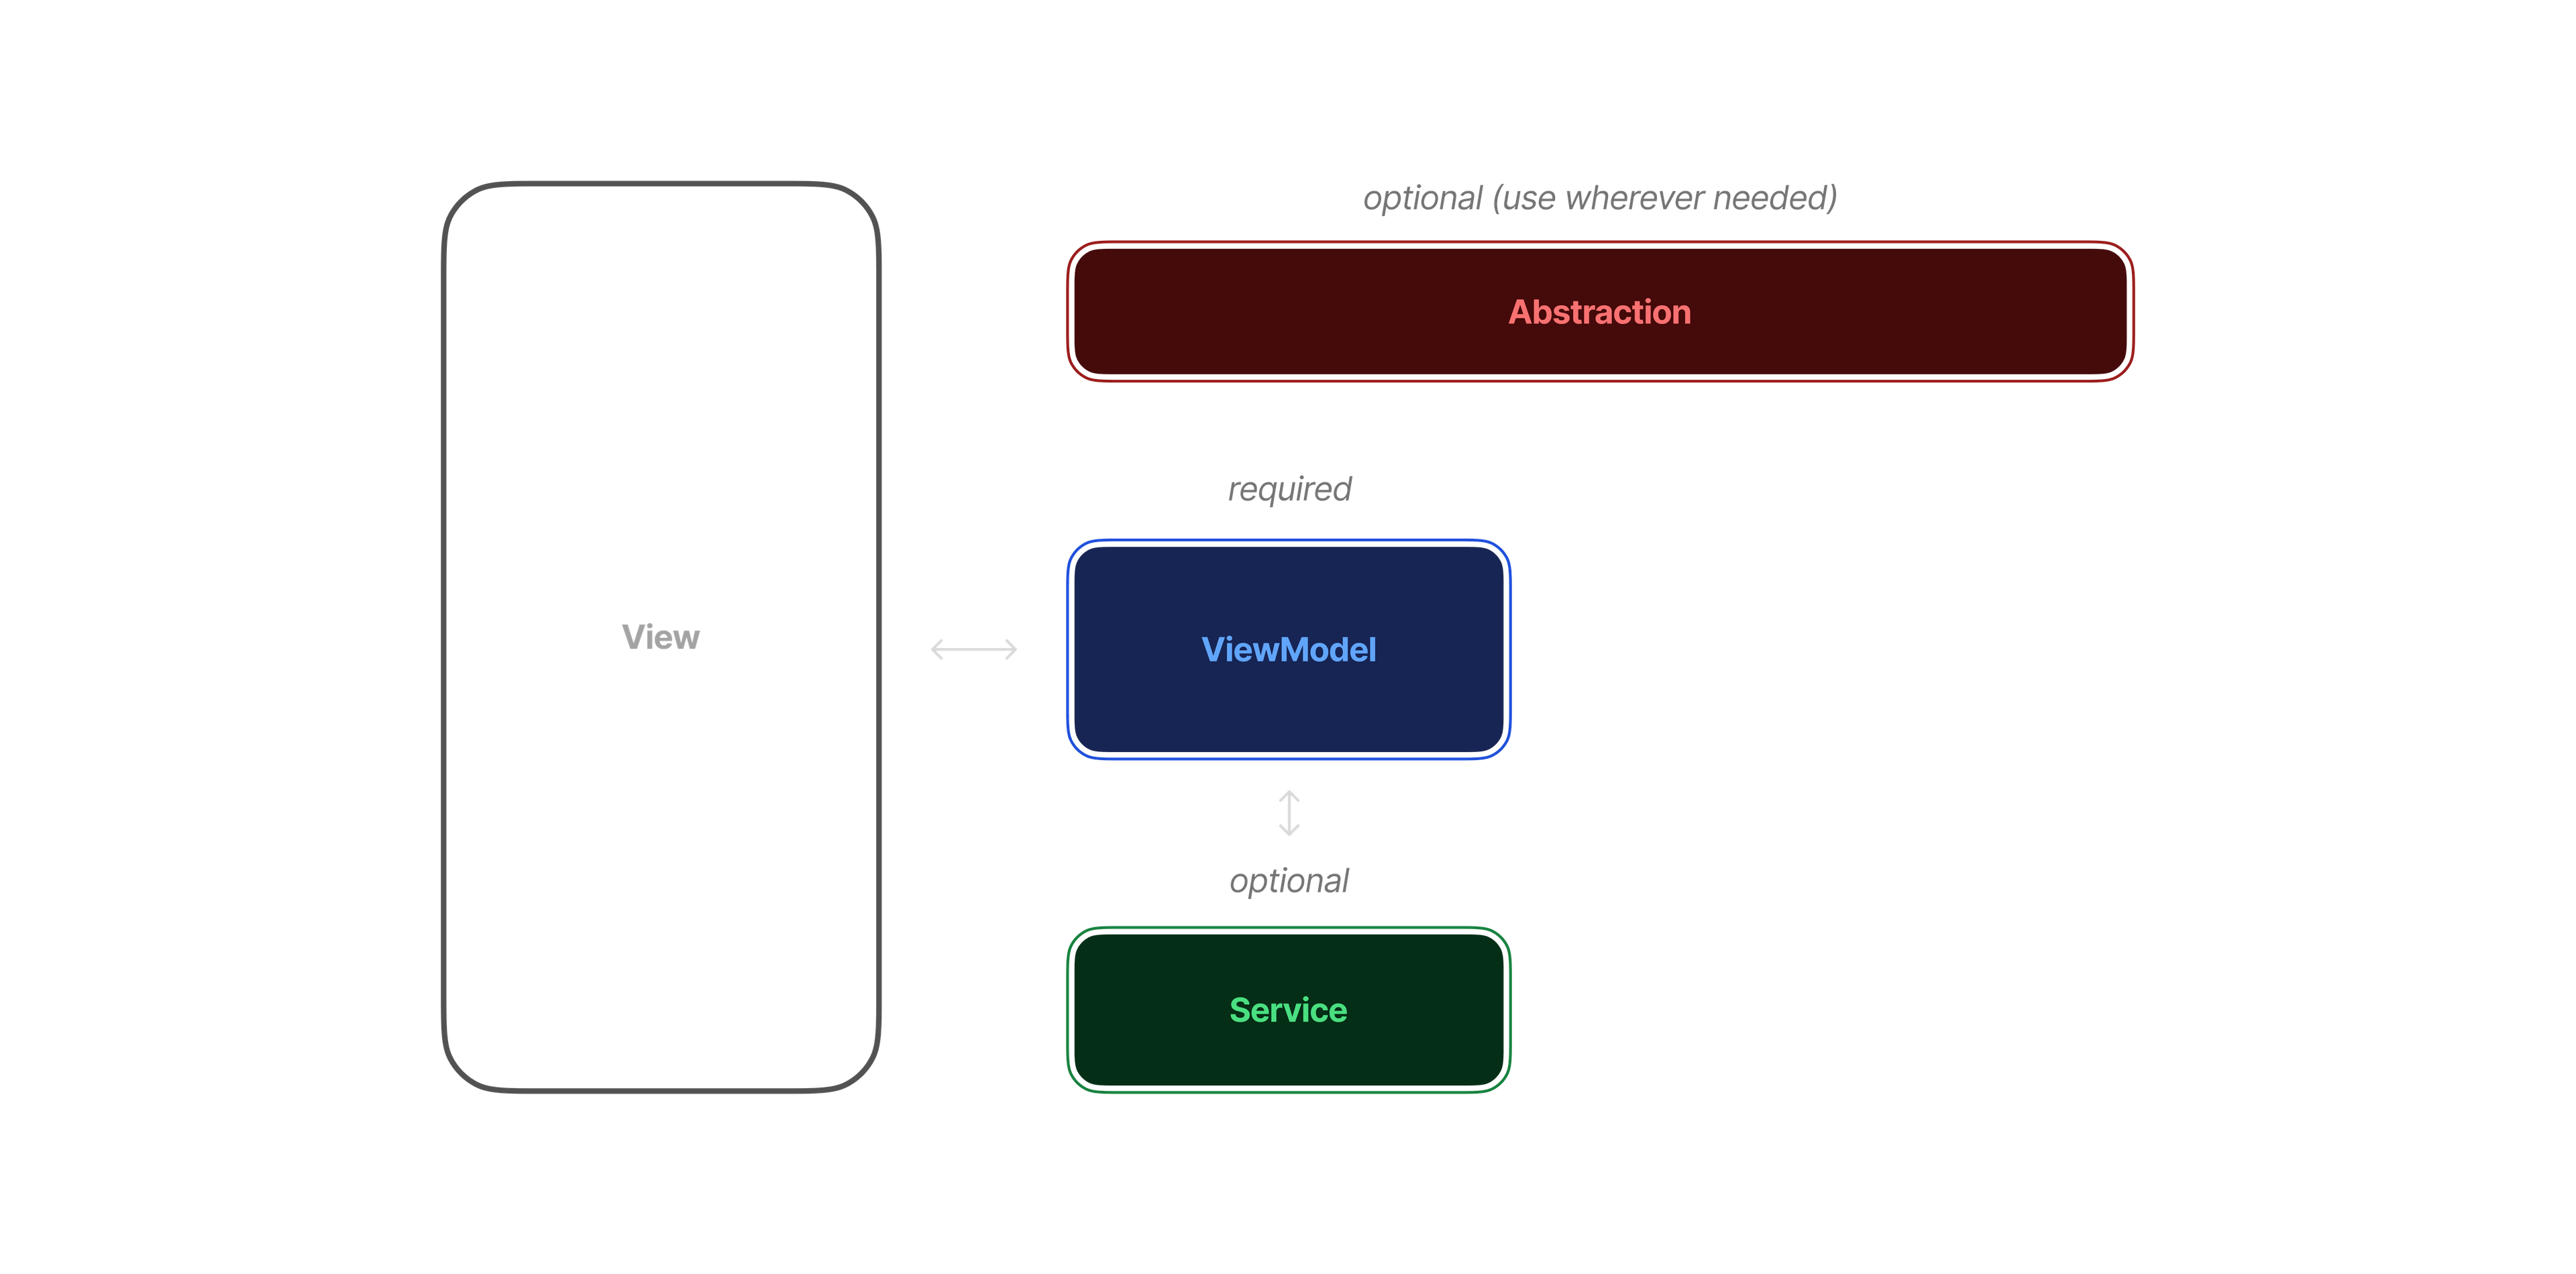
Abstraction layers can be integrated throughout your code and we name these classes by the outside service followed by “abstraction.”
For instance, if we are using Firebase for authentication, we would create a class called FirebaseAuthAbstraction, which would contain the Firebase authentication logic.
Repository
There is one last stage in our complete MVVM approach: the Repository layer.
Each of these layers is only added as your application grows, and the repository layer is only needed when your ViewModels or services become more complex and need to interact with multiple abstractions. This repository layer simplifies how your data is exposed.
Continuing with our user example, we want the authenticated user’s information accessible throughout our application. Thus, we would have a FirebaseAuthAbstraction and a FirestoreAbstraction. The UserRepository would provide a simple API that checks for authentication and retrieves the user data from Firestore.
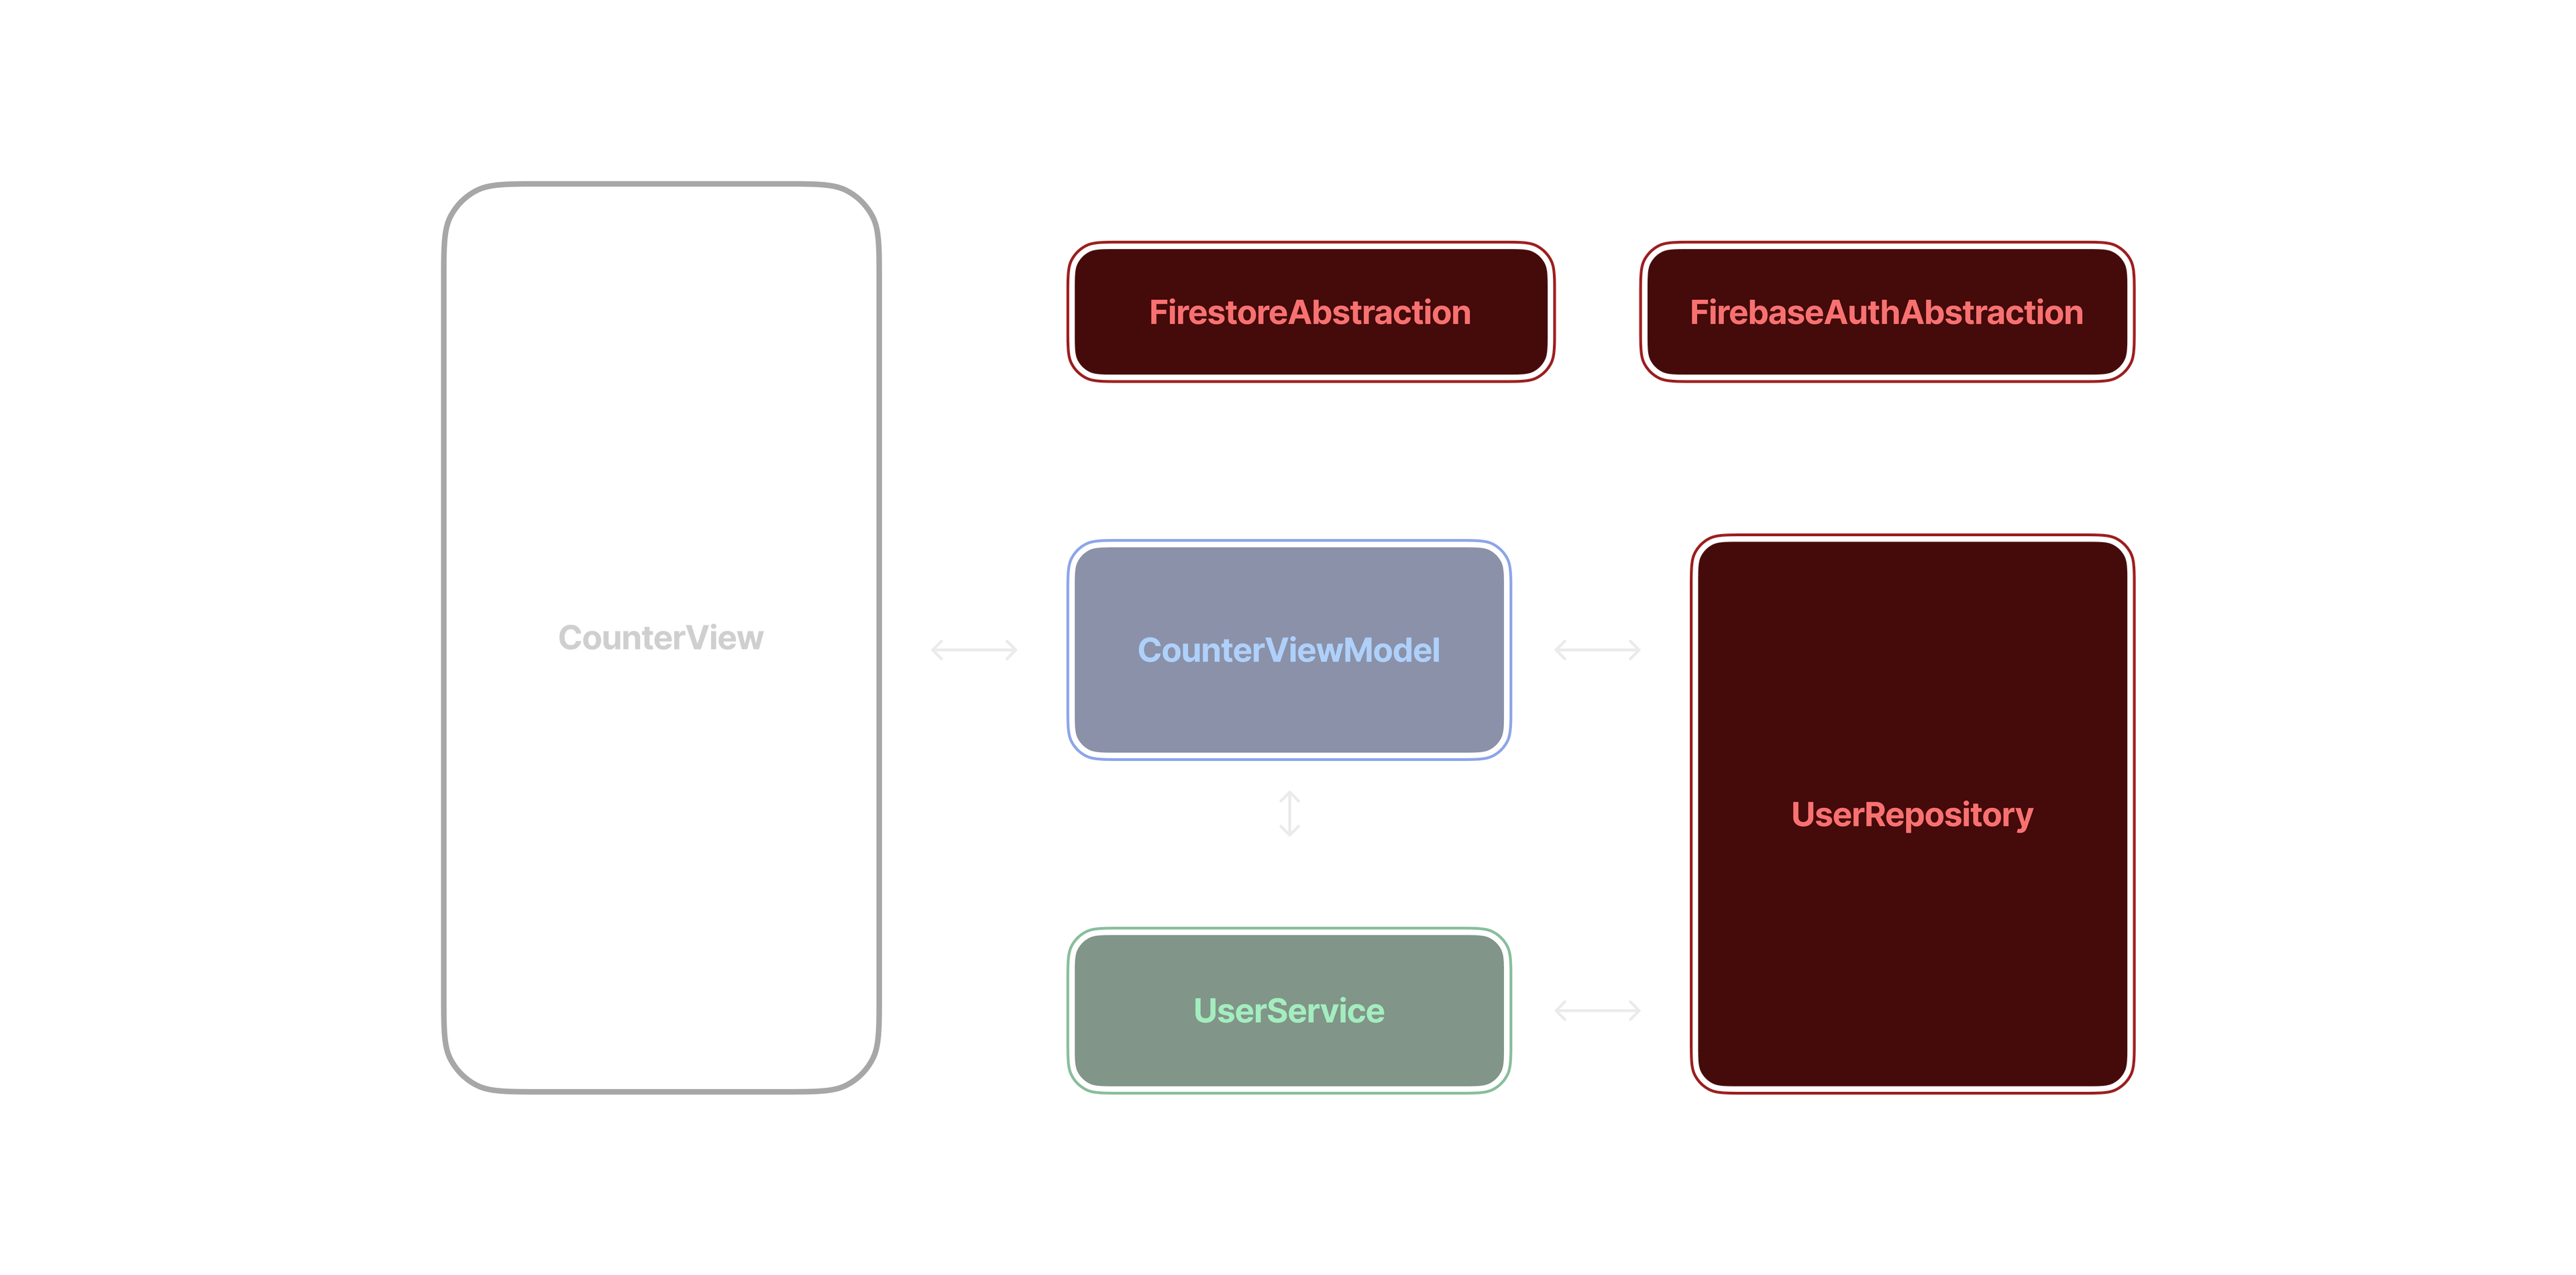
Now our UserService contains just one simple function to interact with user information.

This is our complete MVVM architecture, which we have successfully used in our professional projects.
The beauty of this architecture lies in its componentization. We can easily copy and paste a lot of the code between projects, enabling us to get up to speed quickly.
This architecture closely aligns with the Flutter recommended architecture in the documentation, with the main difference being our additional layer to handle app-wide state.
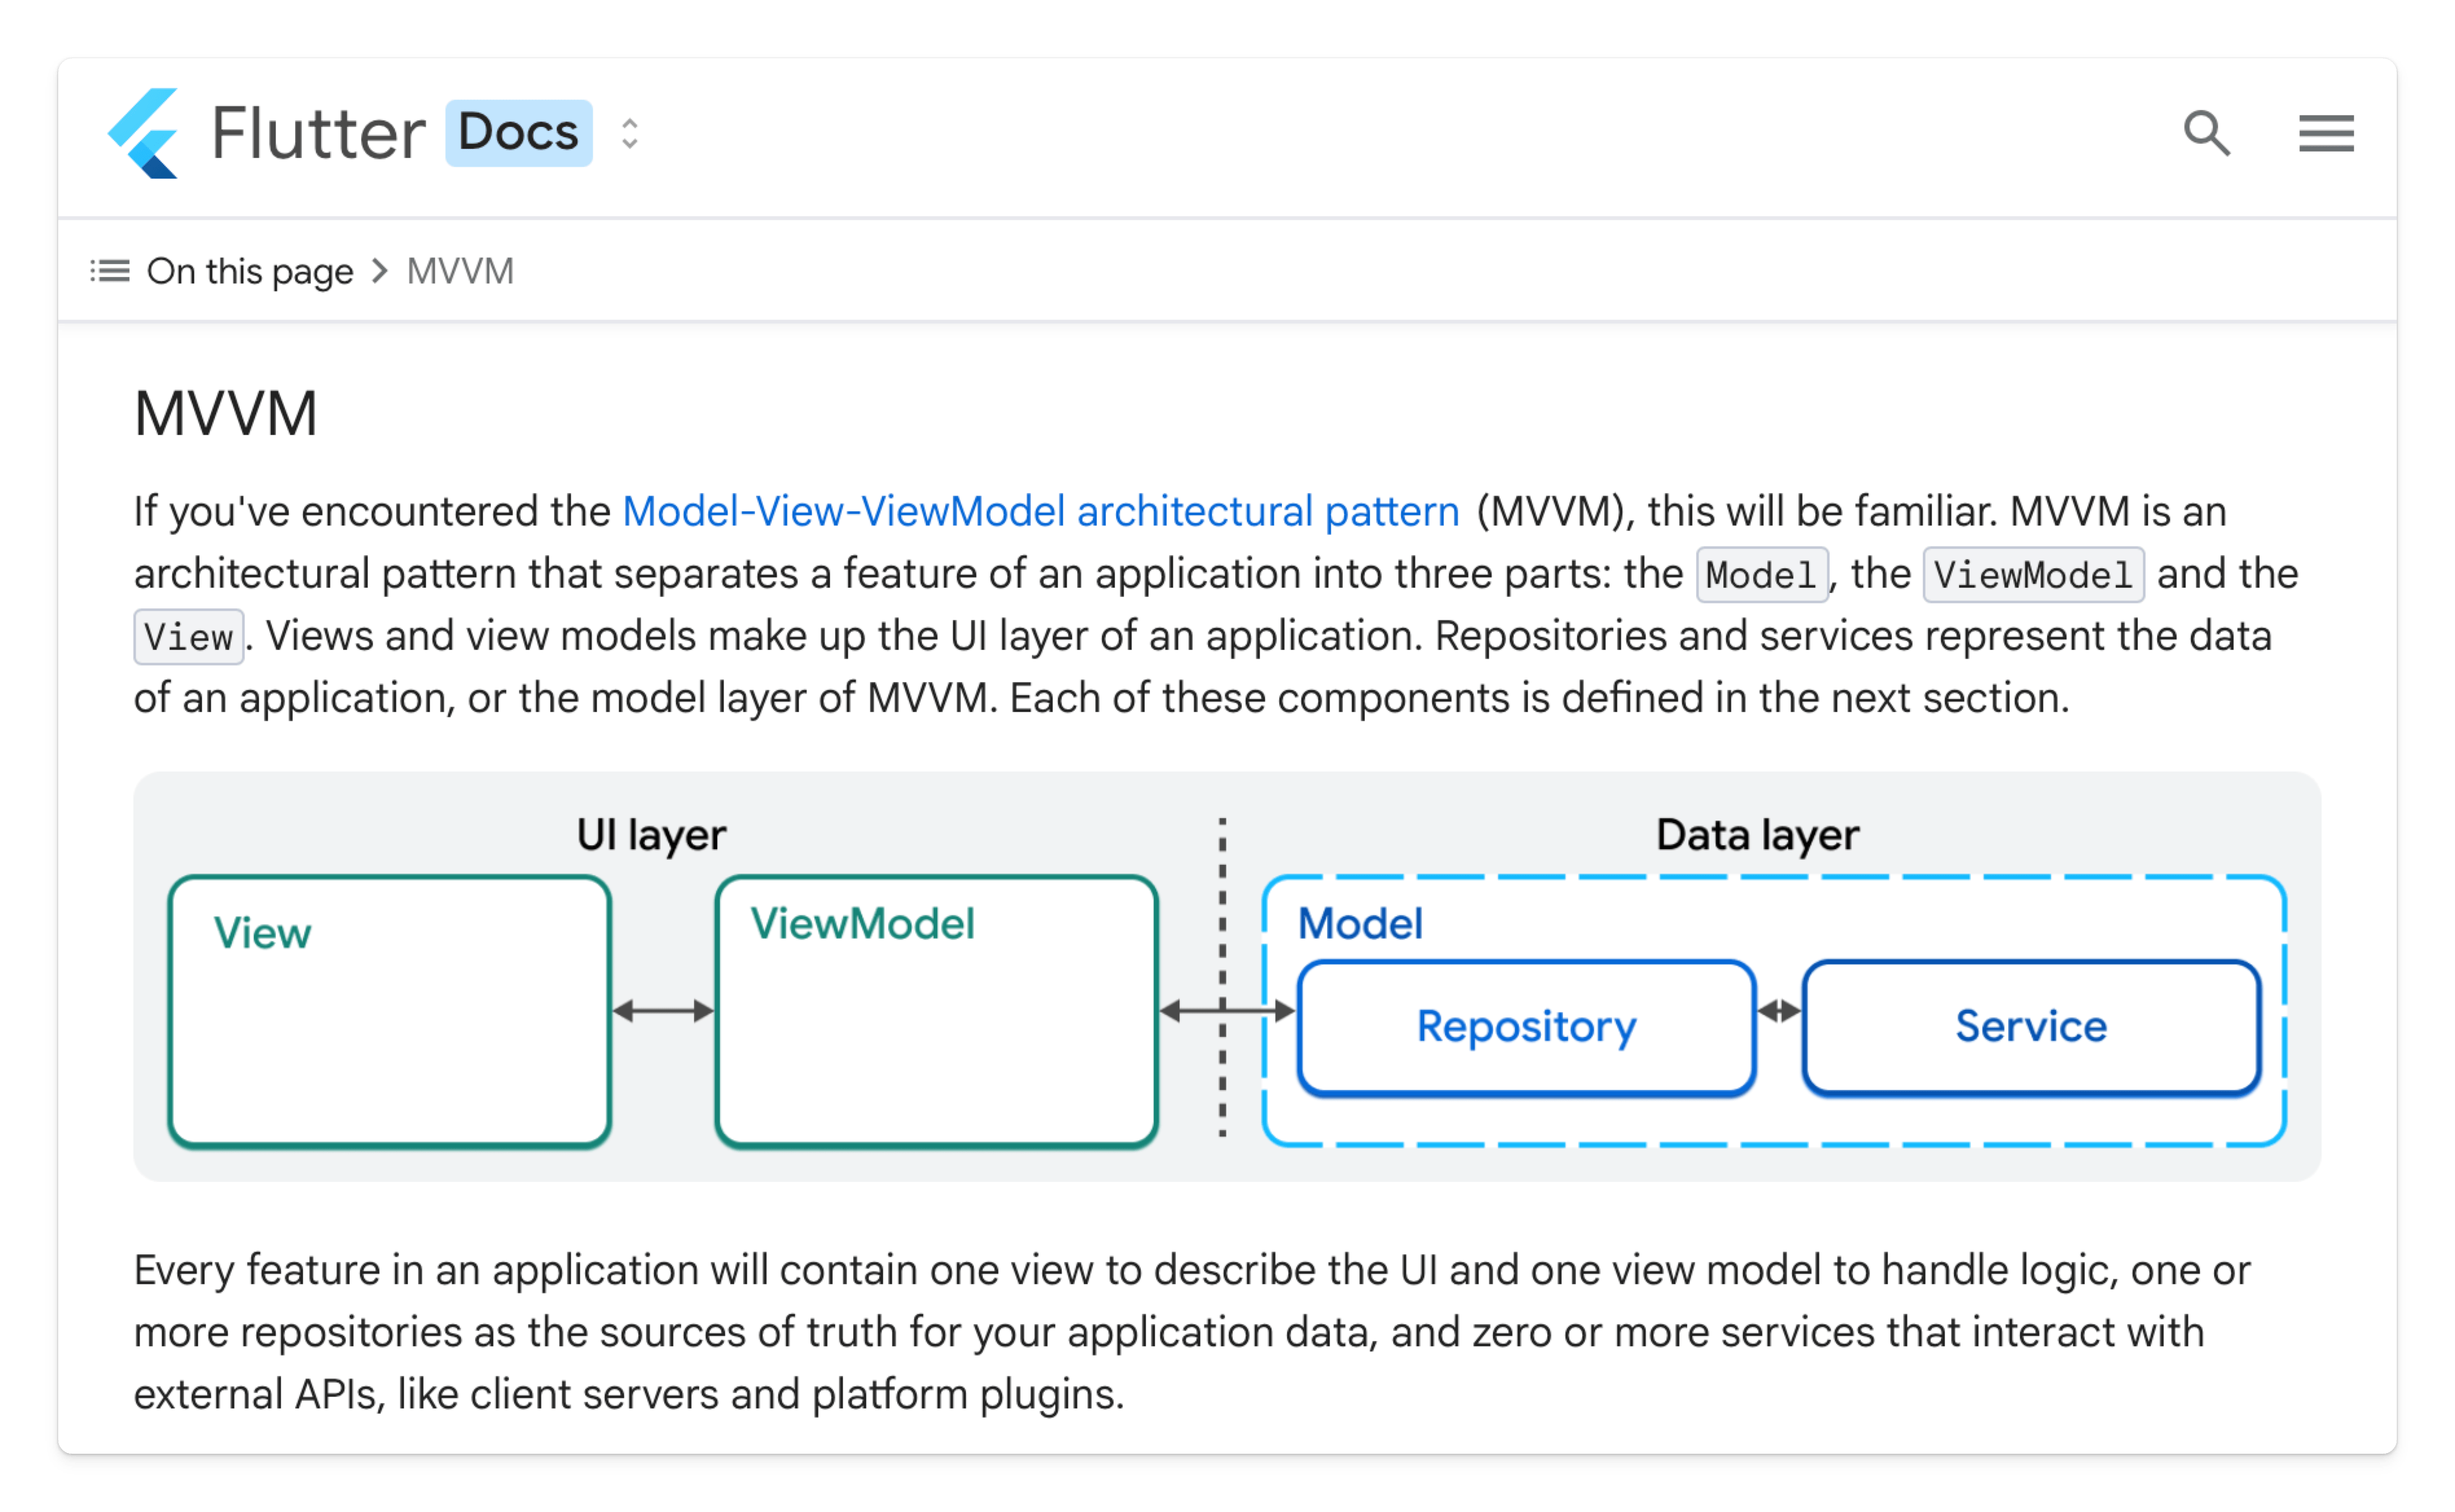
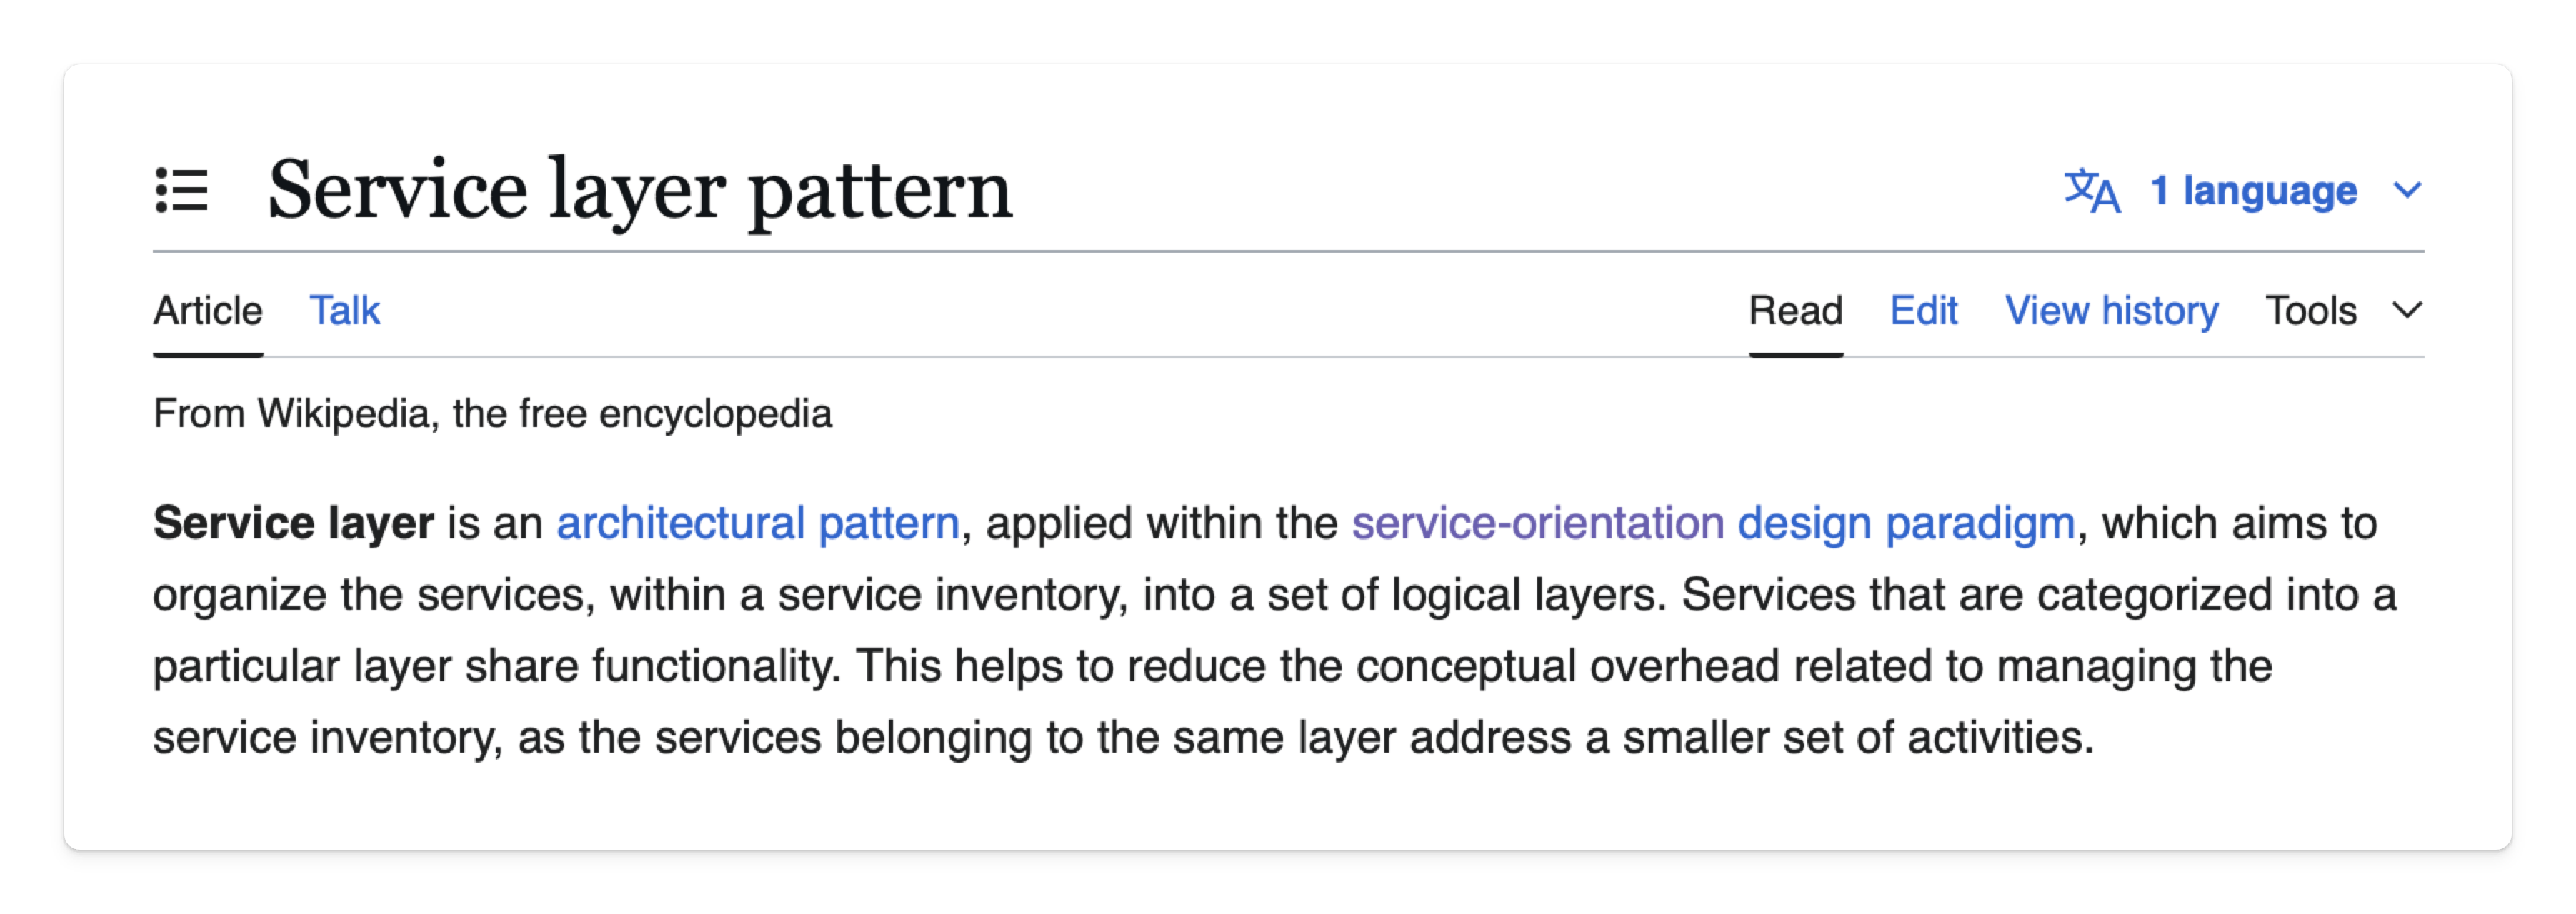
We refer to this layer as the service layer, based on the service layer pattern.
While Flutter’s architecture has a service layer, theirs serves as our abstraction layer.
This concludes our complete guide to MVVM architecture with Flutter. To keep learning, check out this article: Build Maintainable Flutter Apps with These 3 Concepts.
Get Articles in Your Inbox
Sign up to get practical tutorials and production patterns delivered to your inbox.